# SC Agent Source: https://docs.cloud.strettch.com/agents/sc-agent Browser-based console access for your virtual machines The SC Agent is a lightweight, open-source utility that enables web-based console access to your computes directly from the Strettch Cloud dashboard. It manages the SSH connection between your browser and the compute to provide seamless terminal access without requiring SSH client software. **Supported Systems:** Ubuntu 20.04+, Debian 8+ View the [source code on GitHub](https://github.com/strettch/sc-console-agent) ## Automatic Installation The SC Agent installs automatically when you create a new compute instance. No action needed—just wait a few minutes after creation, then access your console from the dashboard. ## Manual Installation Need to install the agent on an existing instance? Here's how: ### Quick Install (Recommended) Run this single command to install the agent: ```bash Install the agent theme={null} curl -sSL https://repo.cloud.strettch.com/console/install.sh | sudo bash ``` The script will automatically detect your OS, set up repositories, and install the agent: ``` --- Installing sc-console-agent for noble --- -> Cleaning up old repository configurations... -> Updating package lists -> Installing prerequisites -> Downloading GPG key -> Adding repository -> Updating package index -> Installing sc-console-agent ... Setting up sc-console-agent (0.1.12) ... Configuring SC-Agent... ℹ️ Creating required directories... ℹ️ Downloading latest agent configuration... ✅ Agent configuration downloaded successfully ℹ️ Enabling sc-console-agent.service... ✅ sc-console-agent.service enabled ℹ️ Starting services... ✅ sc-console-agent.service started successfully ╔════════════════════════════════════╗ ║ SC-Console-Agent Installation Done ║ ╚════════════════════════════════════╝ Service Status: • Main Service: active • Auto-Update: active ✅ sc-console-agent installed successfully! ``` ### Review Before Installing Prefer to inspect the script first? Download and review it: ```bash Review the install script theme={null} curl -sSL https://repo.cloud.strettch.com/console/install.sh ``` ### Verify Installation Check that the agent is running: ```bash Check agent status theme={null} systemctl status sc-console-agent ``` You should see `Active: active (running)`: ``` ● sc-console-agent.service - SC Console Agent - Secure compute console access management Loaded: loaded (/etc/systemd/system/sc-console-agent.service; enabled; preset: enabled) Active: active (running) since Tue 2025-10-14 10:12:20 UTC; 38s ago Docs: https://docs.cloud.strettch.com/agents/sc-console-agent Main PID: 578570 (sc-console-agen) Tasks: 8 (limit: 9435) Memory: 1.9M (peak: 2.4M) CPU: 41ms CGroup: /system.slice/sc-console-agent.service └─578570 /usr/bin/sc-console-agent ``` Access your console from the dashboard within a few minutes. To check the installed agent version: ```bash Check version theme={null} dpkg -l | grep sc-console-agent ``` ## Managing the Agent ### Basic Commands ```bash Start the agent theme={null} sudo systemctl start sc-console-agent ``` ```bash Stop the agent theme={null} sudo systemctl stop sc-console-agent ``` ```bash Restart the agent theme={null} sudo systemctl restart sc-console-agent ``` ```bash Check status theme={null} systemctl status sc-console-agent ``` ### Auto-Start on Boot ```bash Enable auto-start theme={null} sudo systemctl enable sc-console-agent ``` ```bash Disable auto-start theme={null} sudo systemctl disable sc-console-agent ``` ## Viewing Logs ```bash Live logs theme={null} sudo journalctl -u sc-console-agent -f ``` ```bash Last hour theme={null} sudo journalctl -u sc-console-agent --since=1h ``` ```bash Last 100 lines theme={null} sudo journalctl -u sc-console-agent -n 100 ``` ## Updates The agent updates automatically. You can also trigger updates manually: ```bash Check for and install updates theme={null} sudo systemctl start sc-console-agent-updater ``` ```bash View update logs theme={null} sudo journalctl -u sc-console-agent-updater -f ``` ## Uninstalling To completely remove the agent: ```bash Uninstall the agent theme={null} sudo apt-get purge sc-console-agent ``` The uninstall process will stop all services and remove the agent: ``` Reading package lists... Done Building dependency tree... Done The following packages will be REMOVED: sc-console-agent* After this operation, 7,449 kB disk space will be freed. Do you want to continue? [Y/n] Y ... Removing sc-console-agent (0.1.12) ... Removing SC-Agent (keeping configuration)... Stopping sc-console-agent-update-scheduler.timer... Stopping sc-console-agent.service... Disabling sc-console-agent-update-scheduler.timer... Disabling sc-console-agent.service... SC-Agent removed (configuration preserved in /etc/sc-console-agent) Purging configuration files for sc-console-agent (0.1.12) ... ``` **Note:** After uninstalling, console access will be unavailable. You'll need to use SSH with password authentication or SSH keys instead. ## Troubleshooting ### Console Not Working? 1. Verify the agent is running: ```bash theme={null} systemctl status sc-console-agent ``` 2. Check recent logs: ```bash theme={null} sudo journalctl -u sc-console-agent -n 50 ``` 3. Restart the service: ```bash theme={null} sudo systemctl restart sc-console-agent ``` 4. Ensure firewall allows port 22 (SSH - for internal communication) and port 60500 (UDP - for console agent) ### Need Help? Contact support at [cloud@strettch.com](mailto:cloud@strettch.com) with: * Output from `systemctl status sc-console-agent` * Recent logs: `journalctl -u sc-console-agent -n 100` * Your compute instance ID * Description of the issue ## Security The agent uses encrypted communication, cryptographic signatures, and port knocking for secure access. It runs with minimal privileges and updates automatically for security patches. # SC Metrics Agent Source: https://docs.cloud.strettch.com/agents/sc-metrics-agent System monitoring and metrics collection for your virtual machines The SC Metrics Agent is a lightweight, open-source utility that collects system-level metrics from your computes and forwards them to Strettch Cloud. It enables monitoring features including usage graphs, resource tracking, and performance analytics. **Supported Systems:** Ubuntu 20.04+, Debian 8+ View the [source code on GitHub](https://github.com/strettch/sc-metrics-agent) ## Automatic Installation The SC Metrics Agent installs automatically when you create a new compute instance. No action needed—just wait a few minutes after creation, then view your metrics from the dashboard's Graphs tab. ## Manual Installation Need to install the agent on an existing instance? Here's how: ### Quick Install (Recommended) Run this single command to install the agent: ```bash Install the agent theme={null} curl -sSL https://repo.cloud.strettch.com/metrics/install.sh | sudo bash ``` The script will automatically detect your OS, set up repositories, and install the agent: ``` --- Installing sc-metrics-agent for noble --- -> Cleaning up old repository configurations... -> Updating package lists -> Installing prerequisites -> Downloading GPG key -> Adding repository -> Updating package index -> Installing sc-metrics-agent ... Setting up sc-metrics-agent (3.17.1) ... Configuring SC-Metrics-Agent... ℹ️ Creating required directories... ℹ️ Configuring metrics collection... ✅ Metrics agent configured successfully ℹ️ Enabling sc-metrics-agent.service... ✅ sc-metrics-agent.service enabled ℹ️ Starting services... ✅ sc-metrics-agent.service started successfully ╔═════════════════════════════════════════╗ ║ SC-Metrics-Agent Installation Complete ║ ╚═════════════════════════════════════════╝ Service Status: • Main Service: active • Auto-Update: active ✅ sc-metrics-agent installed successfully! ``` ### Review Before Installing Prefer to inspect the script first? Download and review it: ```bash Review the install script theme={null} curl -sSL https://repo.cloud.strettch.com/metrics/install.sh ``` ### Verify Installation Check that the agent is running: ```bash Check agent status theme={null} systemctl status sc-metrics-agent ``` You should see `Active: active (running)`: ``` ● sc-metrics-agent.service - Strettch Cloud Metrics Agent Loaded: loaded (/etc/systemd/system/sc-metrics-agent.service; enabled; preset: enabled) Active: active (running) since Tue 2025-10-14 10:15:30 UTC; 45s ago Docs: https://docs.cloud.strettch.com/agents/sc-metrics-agent Main PID: 578620 (sc-metrics-agen) Tasks: 6 (limit: 9435) Memory: 2.1M (peak: 2.5M) CPU: 38ms CGroup: /system.slice/sc-metrics-agent.service └─578620 /usr/bin/sc-metrics-agent ``` View your metrics from the dashboard's Graphs tab within a few minutes. To check the installed agent version: ```bash Check version theme={null} dpkg -l | grep sc-metrics-agent ``` ## Managing the Agent ### Basic Commands ```bash Start the agent theme={null} sudo systemctl start sc-metrics-agent ``` ```bash Stop the agent theme={null} sudo systemctl stop sc-metrics-agent ``` ```bash Restart the agent theme={null} sudo systemctl restart sc-metrics-agent ``` ```bash Check status theme={null} systemctl status sc-metrics-agent ``` ### Auto-Start on Boot ```bash Enable auto-start theme={null} sudo systemctl enable sc-metrics-agent ``` ```bash Disable auto-start theme={null} sudo systemctl disable sc-metrics-agent ``` ## Viewing Logs ```bash Live logs theme={null} sudo journalctl -u sc-metrics-agent -f ``` ```bash Last hour theme={null} sudo journalctl -u sc-metrics-agent --since=1h ``` ```bash Last 100 lines theme={null} sudo journalctl -u sc-metrics-agent -n 100 ``` ## Updates The agent updates automatically. You can also trigger updates manually: ```bash Check for and install updates theme={null} sudo systemctl start sc-metrics-agent-updater ``` ```bash View update logs theme={null} sudo journalctl -u sc-metrics-agent-updater -f ``` ## Uninstalling To completely remove the agent: ```bash Uninstall the agent theme={null} sudo apt-get purge sc-metrics-agent ``` The uninstall process will stop all services and remove the agent: ``` Reading package lists... Done Building dependency tree... Done The following packages will be REMOVED: sc-metrics-agent* After this operation, 6,823 kB disk space will be freed. Do you want to continue? [Y/n] Y ... Removing sc-metrics-agent (3.17.1) ... Removing SC-Metrics-Agent (keeping configuration)... Stopping sc-metrics-agent-update-scheduler.timer... Stopping sc-metrics-agent.service... Disabling sc-metrics-agent-update-scheduler.timer... Disabling sc-metrics-agent.service... SC-Metrics-Agent removed (configuration preserved in /etc/sc-metrics-agent) Purging configuration files for sc-metrics-agent (3.17.1) ... ``` **Note:** After uninstalling, metrics collection and usage graphs will be unavailable. ## Troubleshooting ### Metrics Not Showing? 1. Verify the agent is running: ```bash theme={null} systemctl status sc-metrics-agent ``` 2. Check recent logs: ```bash theme={null} sudo journalctl -u sc-metrics-agent -n 50 ``` 3. Restart the service: ```bash theme={null} sudo systemctl restart sc-metrics-agent ``` 4. Wait a few minutes for metrics to appear in the dashboard ### Need Help? Contact support at [cloud@strettch.com](mailto:cloud@strettch.com) with: * Output from `systemctl status sc-metrics-agent` * Recent logs: `journalctl -u sc-metrics-agent -n 100` * Your compute instance ID * Description of the issue ## Security The agent uses encrypted communication to securely transmit metrics data to Strettch Cloud. It runs with minimal privileges and updates automatically for security patches. # Changelog Source: https://docs.cloud.strettch.com/changelog Track the latest updates, features, and improvements to Strettch Cloud ### Week of October 21-27, 2025 #### Improvements * Improved data refresh behavior for compute resources * Updated application loading experience * Better handling of beta terms modal on smaller screens #### Bug Fixes * Fixed cost calculation accuracy on billings * Improved DNS record configuration with compute IP address suggestions * Enhanced mobile responsiveness across the platform ### Week of October 14-20, 2025 #### New Features * Added private beta access page for users waiting for approval * Introduced disk IOPS (Input/Output Operations Per Second) monitoring * Added multi-copy options for compute connection details * Implemented mobile access restriction notifications #### Improvements * Enhanced team invitation system with better access control * Improved navigation for users with inactive accounts * Enhanced chart displays with better data handling for incomplete timelines * Improved responsive design for mobile devices #### Bug Fixes * Fixed team switching functionality * Updated default SSH connection to use port 222 * Resolved compute name formatting (spaces to hyphens) ### Week of October 7-13, 2025 #### New Features * Implemented public IP address allocation management #### Improvements * Improved tag input behavior - tags now register on blur * Updated compute history modal with more detailed information #### Bug Fixes * Fixed signup callback page glitches * Resolved tag overlap issues when multiple tags are present * Improved permission controls for team invitations # Core Concepts Source: https://docs.cloud.strettch.com/core-concepts Understanding the fundamental building blocks of Strettch Cloud Before deploying your first resources on Strettch Cloud, understanding these core concepts will help you organize your infrastructure and manage costs effectively. *** ## Understanding Teams **Problem**: How do I organize my cloud resources and collaborate with others? Teams are the top-level organizational structure in Strettch Cloud. Every resource you create—compute instances, DNS zones, and more—belongs to a team. ### How Teams Work When you create your first account, Strettch Cloud automatically creates a default team for you, named after your first name (for example, "Liberi's Team" if your name is Liberi). You can create additional teams or join existing ones to collaborate with other users. **Team Structure with Multiple Teams**: ### Key Team Principles * **Resources belong directly to teams**: There is no intermediate project layer. When you create a compute instance or DNS zone, it belongs to the team. * **Users can join multiple teams**: You can be a member of several teams simultaneously, each with its own resources and billing. * **Teams have roles**: Teams include roles (owner, admin, member) to control who can manage resources. See the Teams documentation for details on permissions. * **Teams are isolated**: Teams cannot share resources or billing with each other. Each team operates independently. **Violation Policy** If any team member uses a team resource to commit a violation (for example, illegal activity on a compute instance), all resources belonging to that team will be shut down immediately pending investigation. This may result in a permanent ban. *** ## How Billing Works **Problem**: When am I charged for my cloud resources? Strettch Cloud uses a **pay-as-you-go** billing model. Understanding how this works helps you predict and control costs. ### Pay-as-you-go vs Pay-per-use Strettch Cloud uses **pay-as-you-go**, not pay-per-use. Here's the comparison: | Billing Model | How It Works | Used by Us? | | ----------------- | ----------------------------------------------------------------------------------------------------------------------------------------------------------------------------------- | ----------- | | **Pay-as-you-go** | You are billed for how long you reserve resources, regardless of actual usage. A compute instance reserved for 24 hours costs the same whether you use it heavily or leave it idle. | ✓ Yes | | **Pay-per-use** | You are billed based on actual resource consumption with auto-scaling. If a 1 CPU / 2GB instance scales to 2 CPU / 4GB, you are billed for the increased specs. | ✗ No | **Billing Example** A compute instance costs **10 RWF per hour**. If you reserve this instance for 24 hours (one day): ``` 10 RWF/hour × 24 hours = 240 RWF per day ``` You pay 240 RWF for that day regardless of whether the instance processes workloads all day or sits idle. Your monthly bill accumulates these daily charges throughout the billing cycle. Stopping a compute instance does not stop billing. To stop incurring charges, you must destroy the resource. See [Resource Lifecycle in SC Compute Overview](/services/compute/overview#resource-lifecycle) for details on resource states. *** ## Next Steps Now that you understand how teams and billing work: * [Create your first compute instance](/getting-started/quickstart) * [Learn about SC Compute and resource lifecycles](/services/compute/overview) * [Manage your team](/guides/teams) * [Set up DNS for your domains](/guides/domains) # How We Process Your Invoices Source: https://docs.cloud.strettch.com/faqs/invoices Understand how our Invoicing process works Strettch Cloud billing cycles are monthly. On the first day of each month, we invoice and charge your team’s primary payment method for the previous month’s usage. If your team does not use any resources, you do not receive an invoice. Invoices include the following information: * Charges the team has accured in a billing cycle, like resource usage * **Credits** applied to the invoice, if any * **Purchase orders**, if any * Reference information, like the invoice number, payment due date, and the name and email address on the team You can update the team information displayed on invoices on the **Settings** page’s **Invoices** tab. Any changes you make are immediately visible on invoices you view thereafter. ## View and Download Invoices When we create an invoice, we email a PDF of it to team members with the owner or biller role. Invoices are also available directly in the control panel, as a downloadable PDF. On the Invoices tab of the Settings page, your latest invoice is visible in the Month-to-date Summary section: 
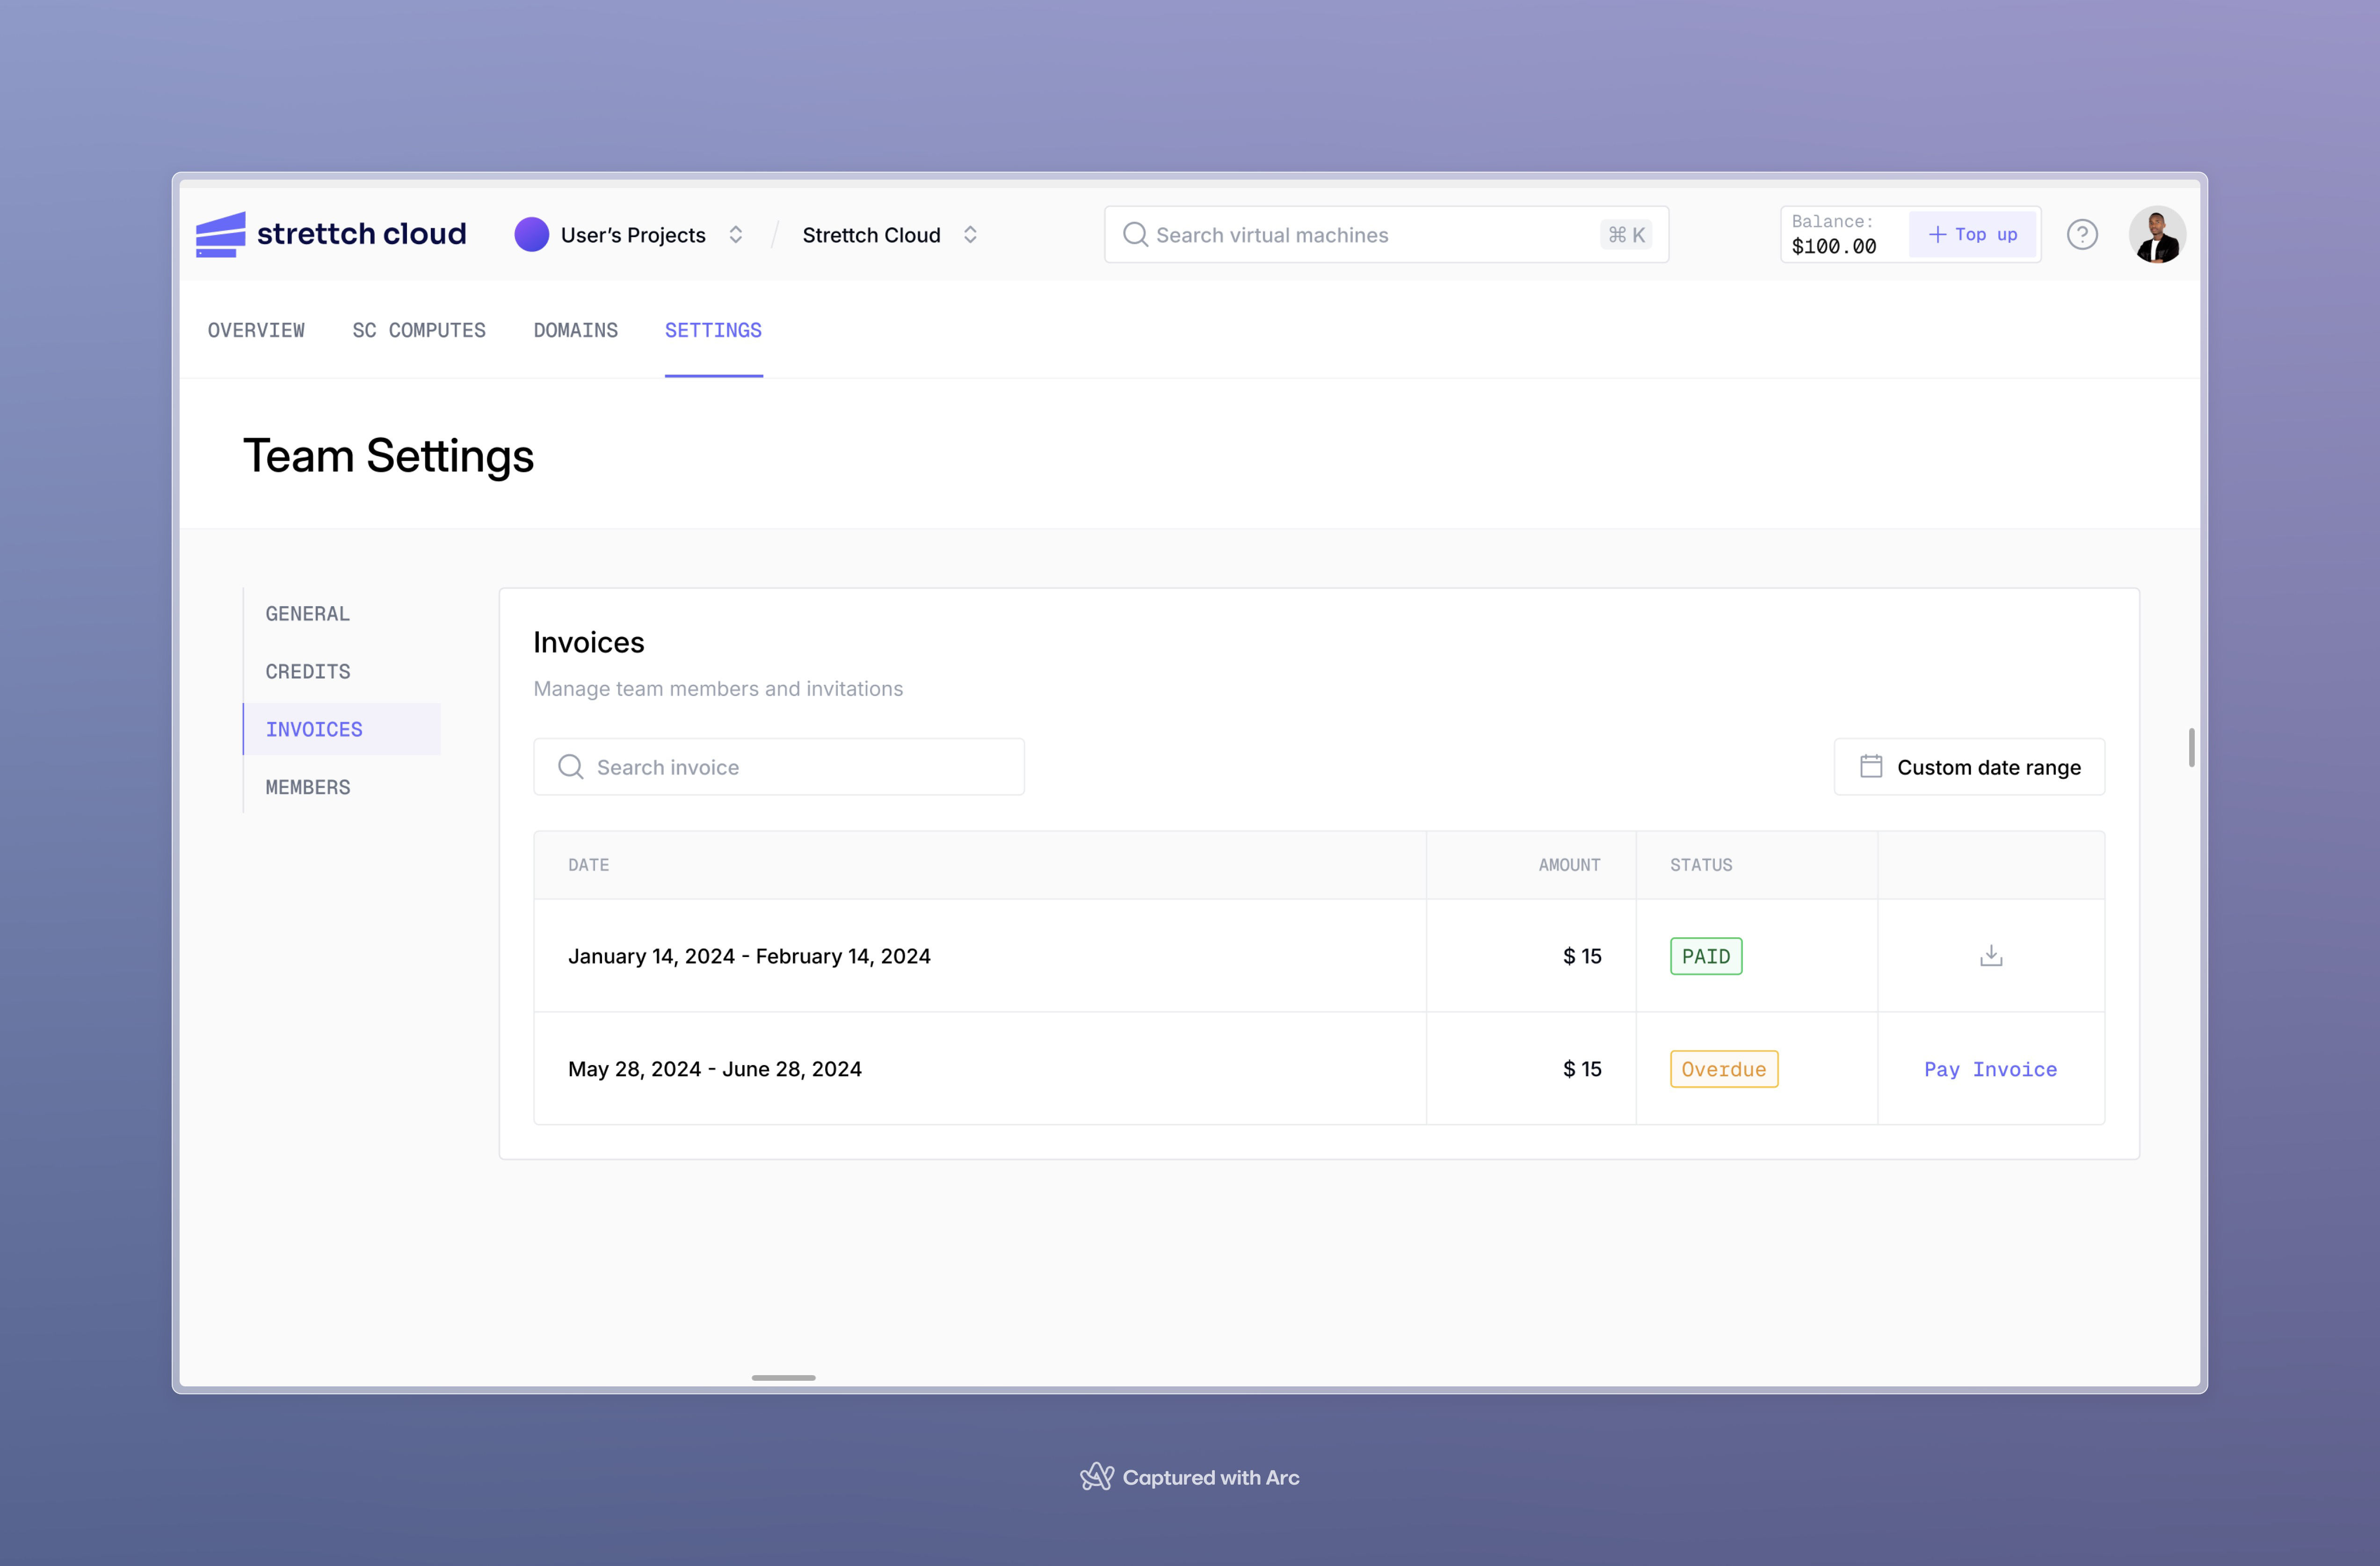
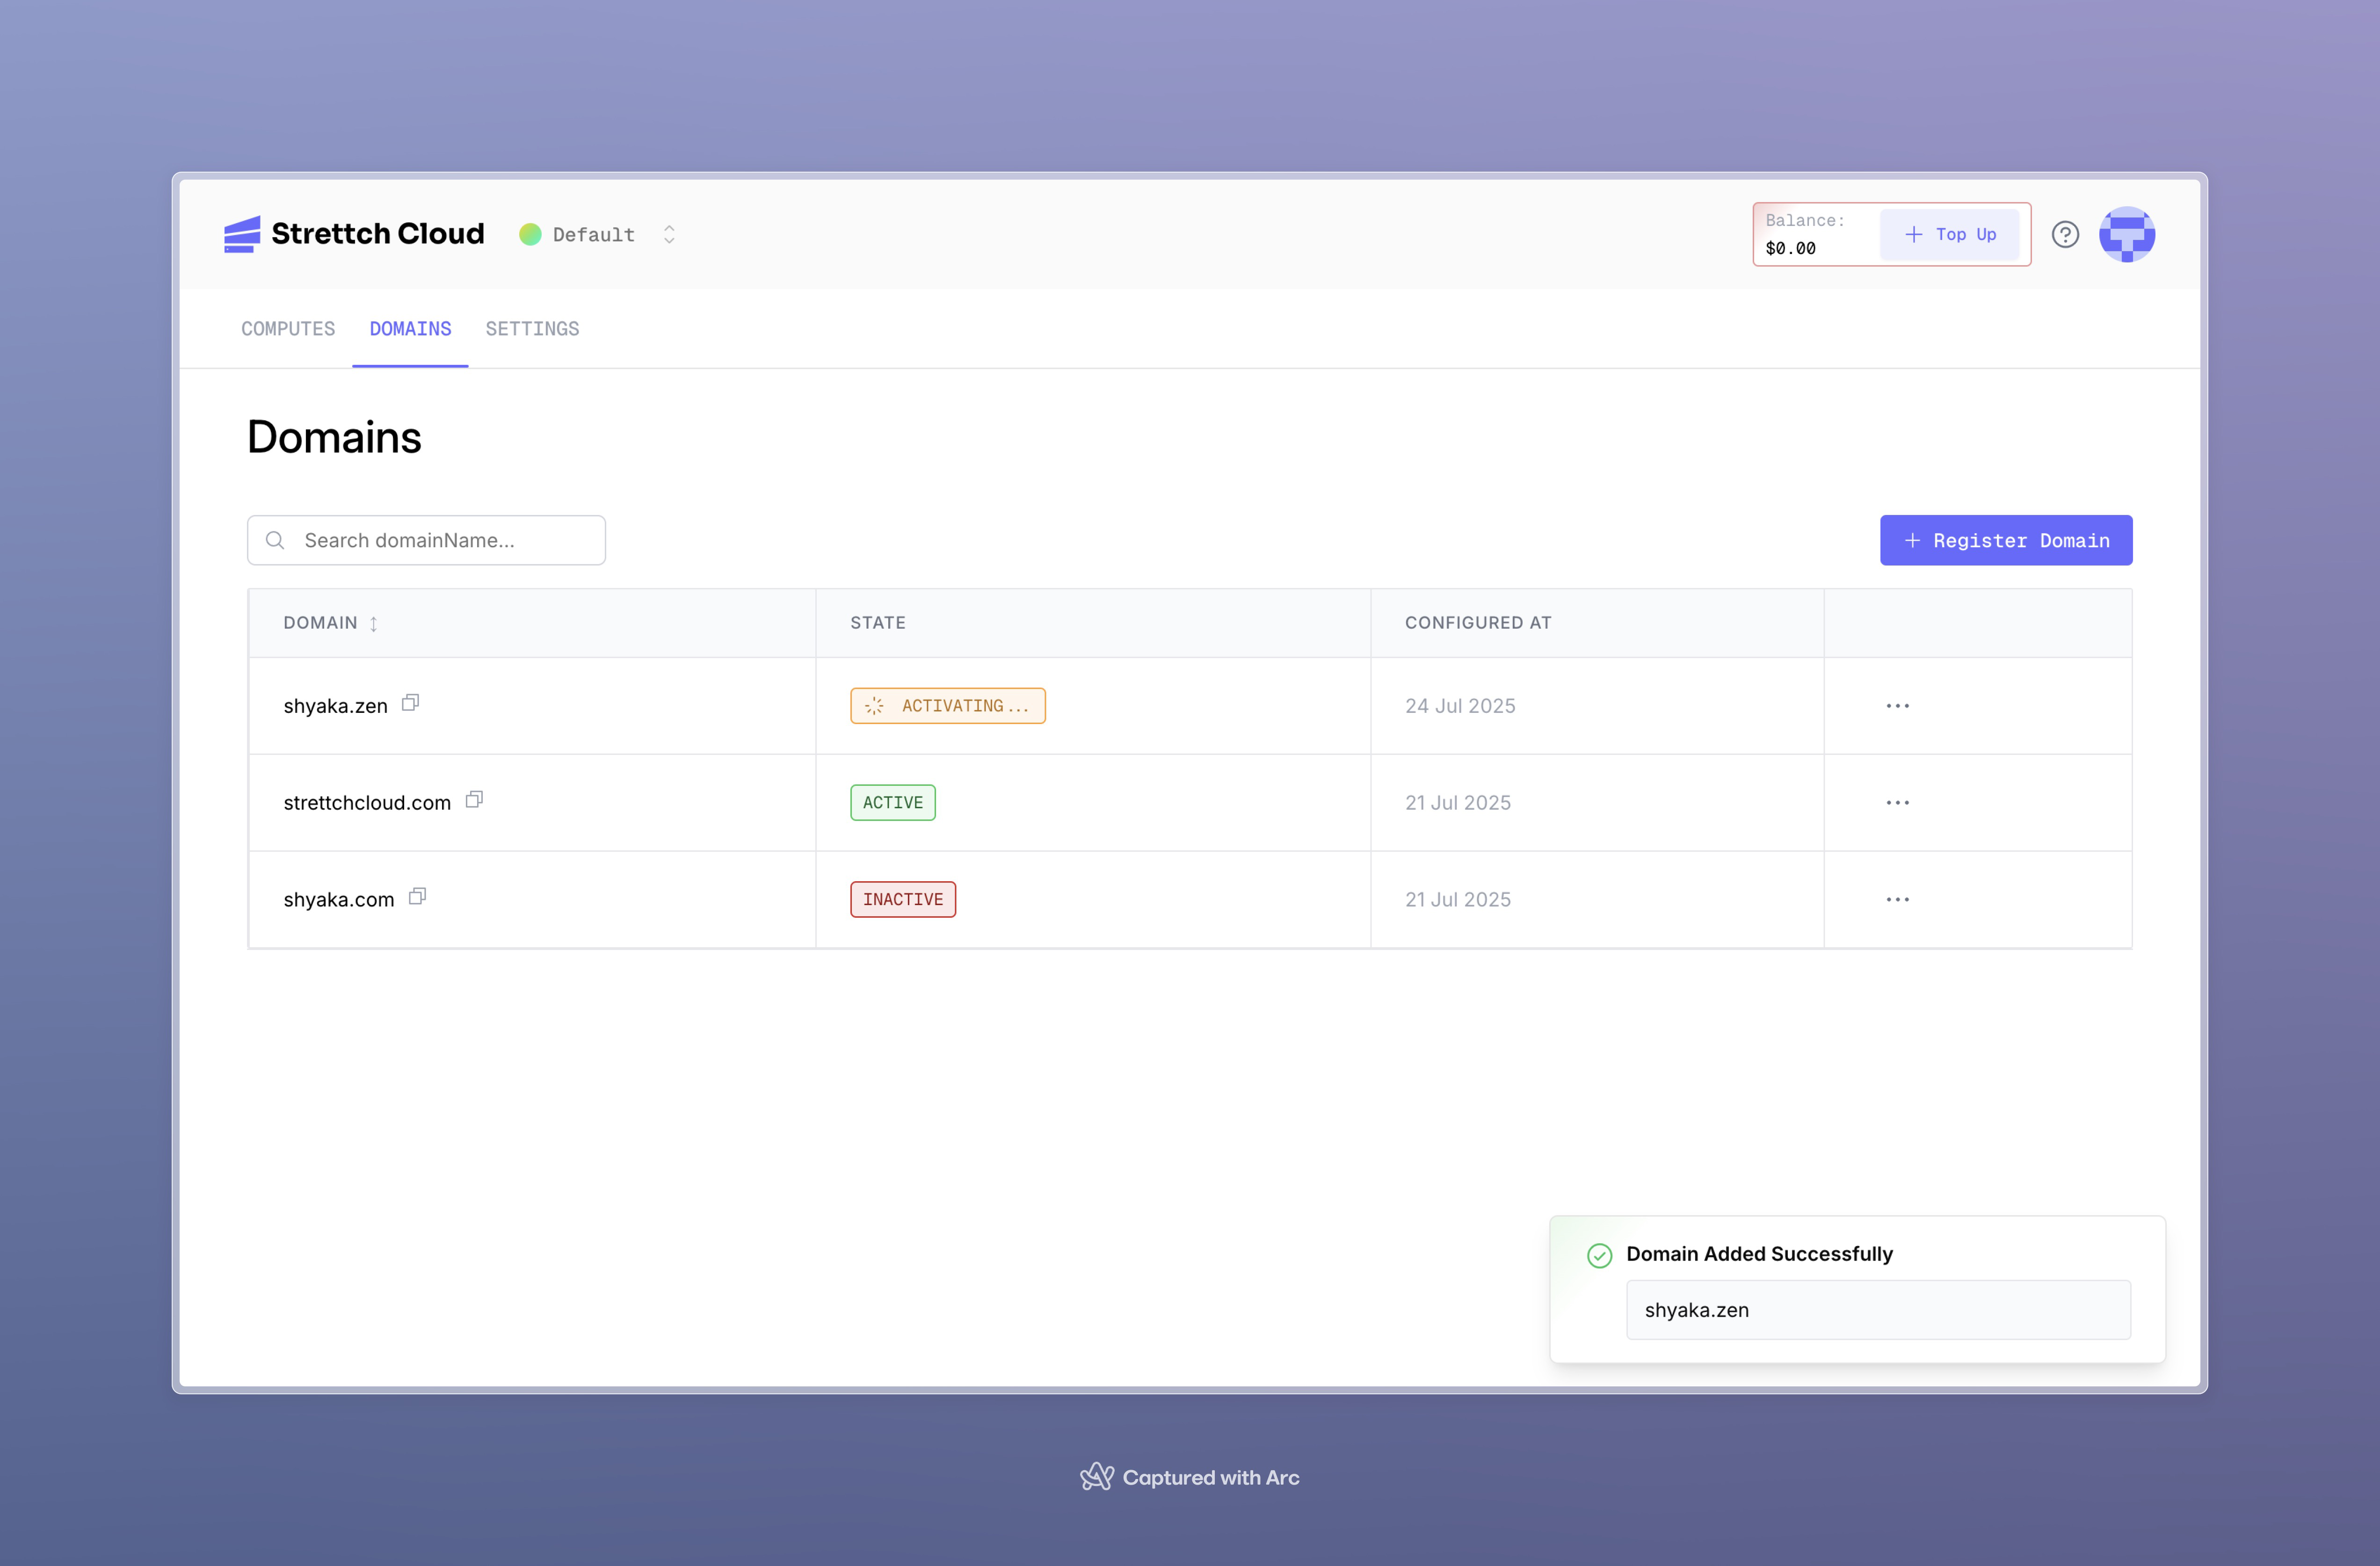
In this section, you can: * View the invoice in your browser, and expand details on the charges by resource type and individual resource * Download a PDF of the invoice To download the PDF version of the invoice, click **Download icon**. ## Invoice Limits The following limits apply to invoices: * We cannot change invoice and billing dates. * Invoices do not reflect PayPal pre-payments or credit/debit card payments. Invoices are not receipts for any such payments. * We bill exclusively in USD and all invoices are in USD. We do not invoice in local currency. In addition to monthly invoice emails, you will receive billing alerts, which are emails you receive when your monthly spending exceeds a certain threshold. # How to Pay Your Bill Source: https://docs.cloud.strettch.com/faqs/paying-your-bill Understand how our billing process works ## Payment Methods and Due Dates Strettch Cloud billing cycles are monthly. Your balance accrues over the course of the calendar month based on your resource usage. Your balance is due on the first day of each month. If your team is new, your balance may instead be due when your balance exceeds your usage threshold. Usage thresholds are predetermined spending limits for new or unverified users that, when met, triggers a charge to the team’s primary payment method. We remove usage thresholds automatically once a team has a reliable history of payments. There are two ways to pay for your resource usage: * At any time during the month, you can **manually make a payment** using any valid payment method. This lets you pay for your month-to-date resource usage before it’s due, pay an overdue balance, or make a pre-payment. Pre-payments let you pay ahead of time for future resource usage. * When your balance is due, we first apply any pre-payments, then we automatically charge the primary payment method on your team for the remaining balance. We currently accept payment using credit cards (Visa, MasterCard, American Express, Discover, UnionPay, Diners Club, and JCB), debit cards, and third-party providers (including PayPal, Google Pay, and Apple Pay). For qualifying customers, we also support direct debit from banks. ## Making a Payment You can make a manual payment on the **Billing tab** of the **Settings** page. Your current balance is always listed at the top of the page, next to a top-up button. The text of the button varies if the balance is overdue or if you’re making an early payment. Click the topu-up button to open a payment modal. In the Payment Amount section, you can select from any past due balance, estimated costs for the current billing period, or a custom amount. 
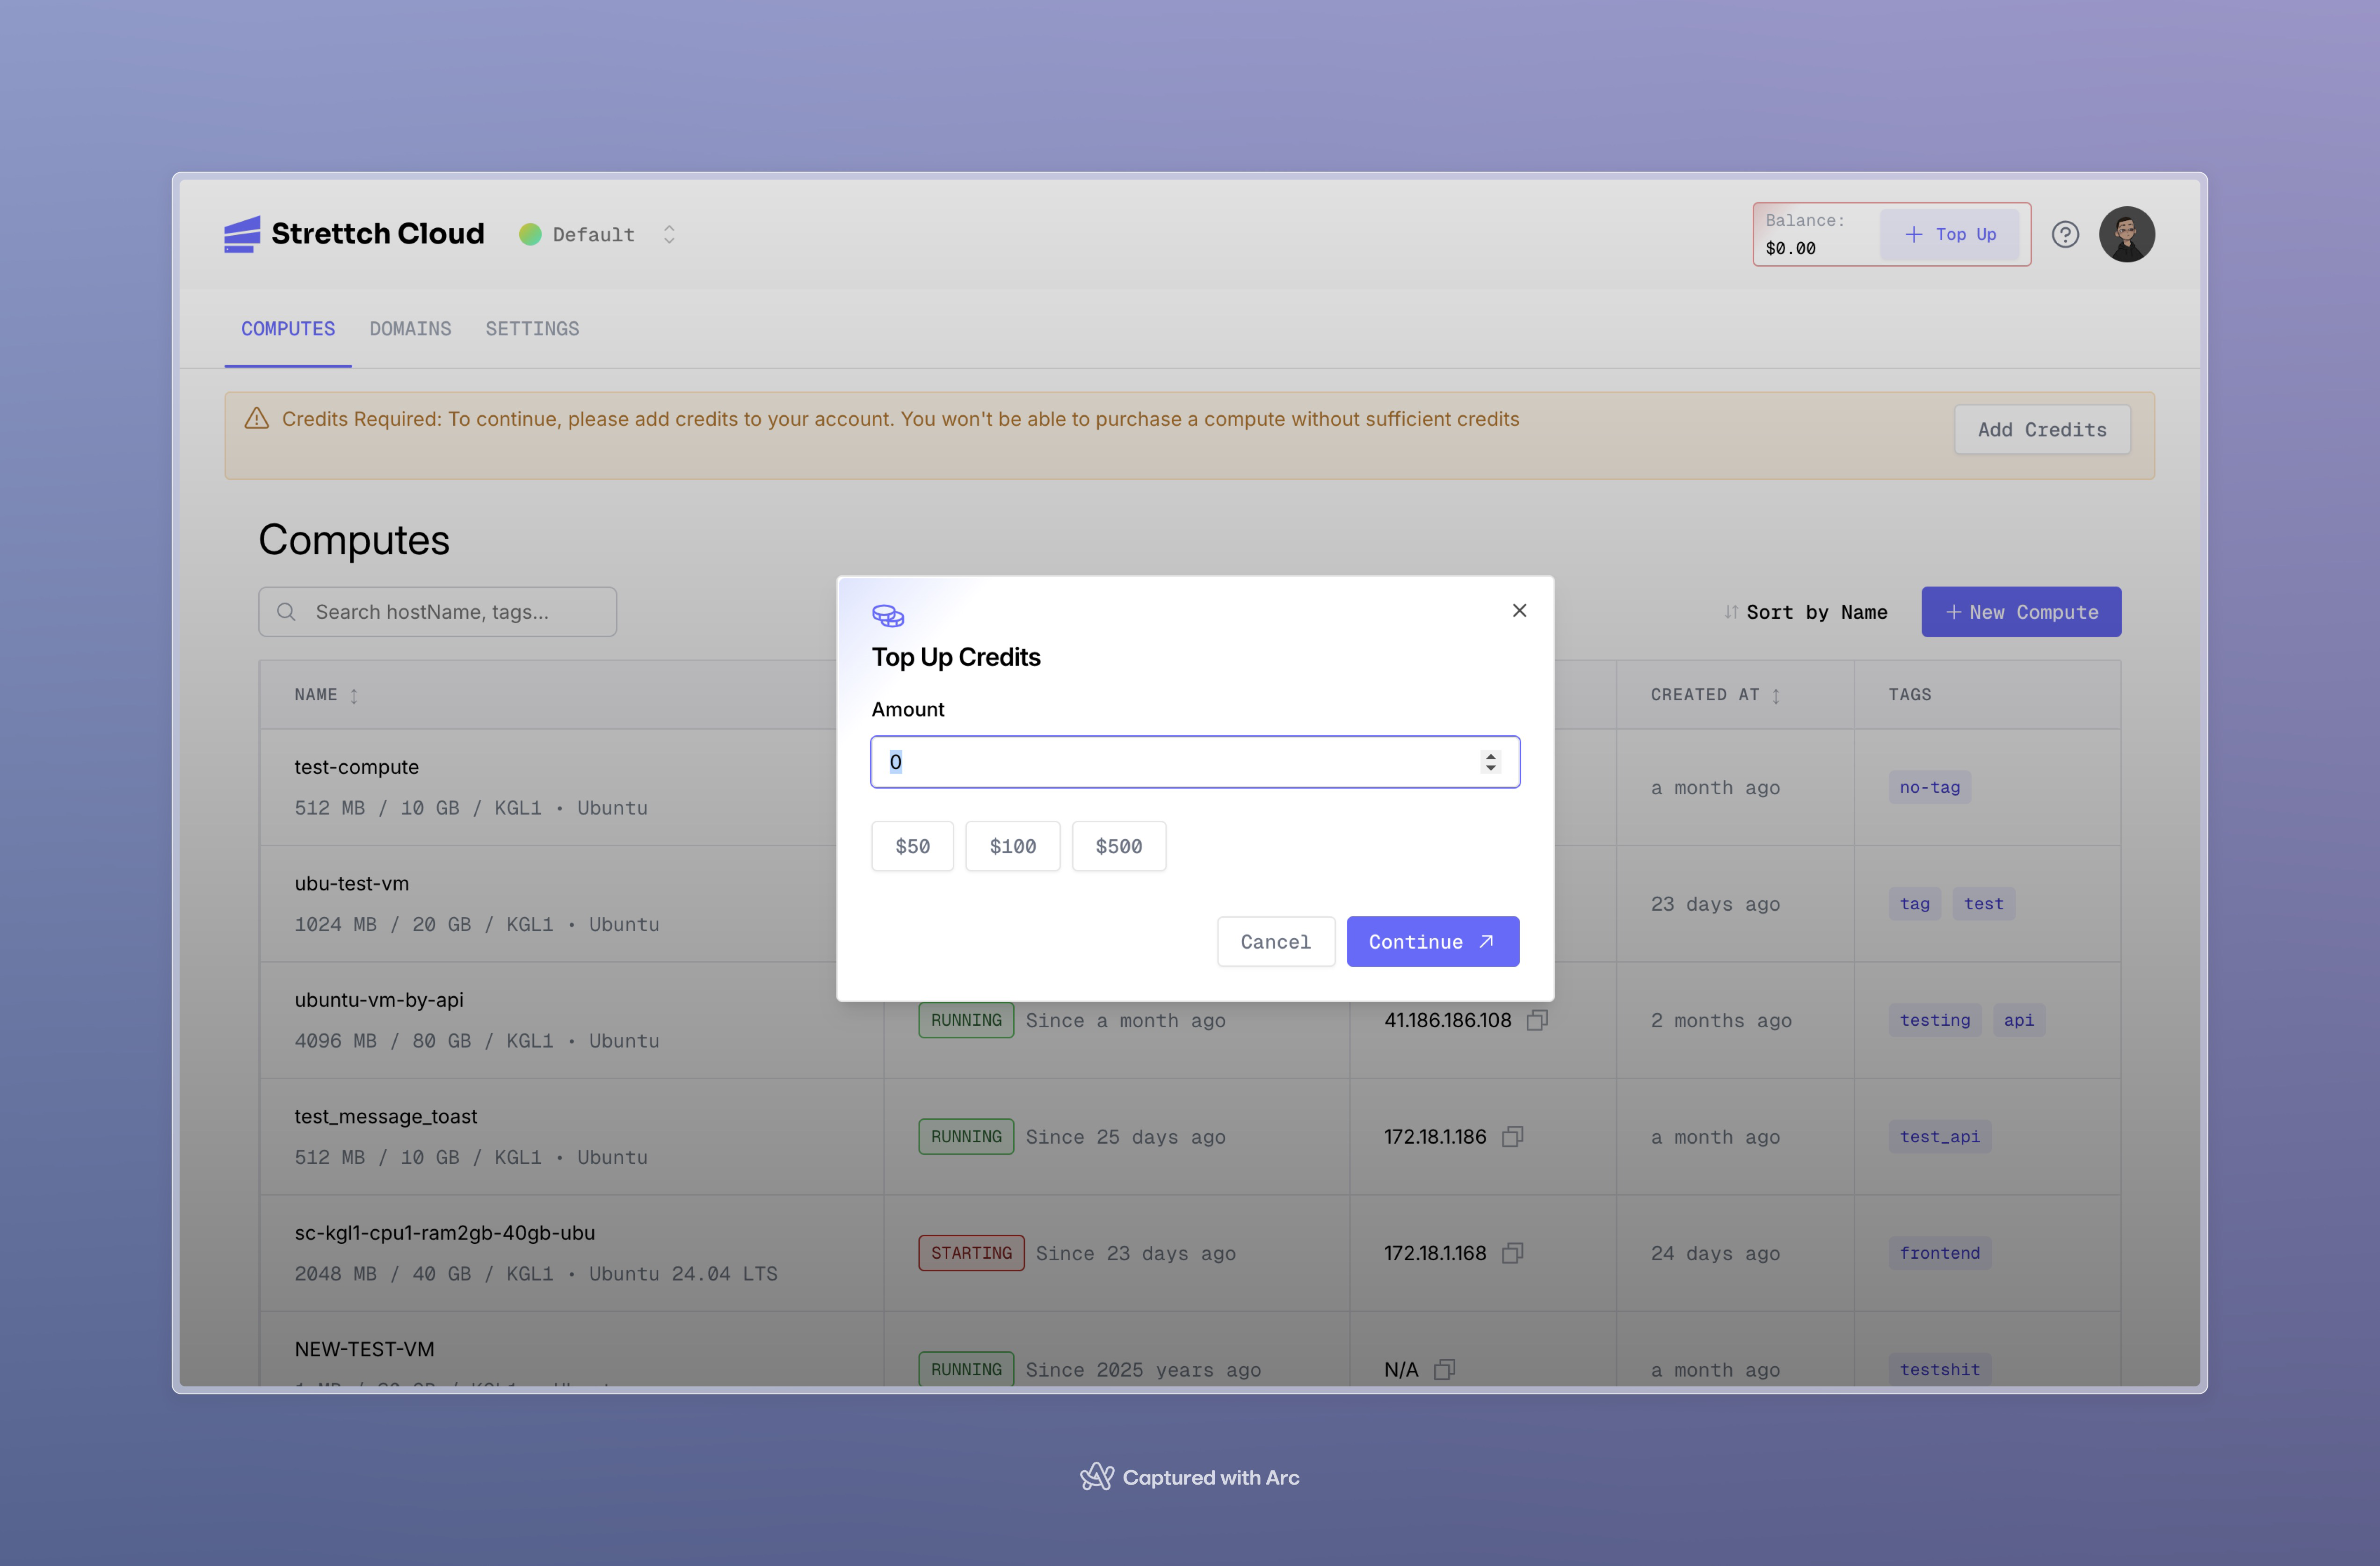
After you enter the amount you want to pay, you can make the payment in two ways: * **Saved Payment Methods**. You can choose from any credit card, debit card, or third-party provider that you have already saved to the team. You can also add a new credit or debit card with the Add card option in the drop-down menu. To use this option, select or add a card, then click Submit Payment to pay. * **Pay with a 3rd-Party Provider**. You can submit a one-time payment with a third-party provider, which in our case is **Irembo Pay**. To use this option, click the top-up button, then complete the transaction after you are rerouted to that provider. When using **Irembo Pay**, your balance updates after your payment is processed, which often takes several hours due to processing. It also sometimes holds payments for up to 72 hours, meaning they have received your money but haven’t sent it to us yet, but the payment still applies once they release it. # Quickstart Source: https://docs.cloud.strettch.com/getting-started/quickstart Deploy your first cloud instance on African infrastructure in 5 minutes ## Getting Your First Instance Running This guide walks you through creating a Strettch Cloud account and deploying your first compute instance. You will have a running virtual machine accessible via web console and SSH in less than 5 minutes. By the end of this guide, you will have: * A verified Strettch Cloud account * A running compute instance with public IP * Terminal access through both web console and SSH *** ## Step 1: Create Your Account Visit [https://console.cloud.strettch.com/](https://console.cloud.strettch.com/) to begin. ### Choose Your Sign-In Method Strettch Cloud supports two authentication providers to make team collaboration easier: Use your GitHub account to authenticate Use your Google account to authenticate Click your preferred option to continue. ### Verify Your Phone Number After authenticating, you will be prompted to add your phone number. Phone verification serves as a second layer of identification to maintain platform integrity. 1. Enter your phone number in international format (e.g., +250788123456) 2. Click **Send Verification Code** 3. Choose where to receive your verification code: * **WhatsApp:** Receive code via WhatsApp message * **SMS:** Receive code via text message **Non-Rwandan Phone Numbers:** If your phone number does not start with +250, only WhatsApp verification is available. The verification code will be sent automatically to your WhatsApp. 4. Enter the verification code you received 5. Complete account setup Your account is now active and ready to use. *** ## Step 2: Create Your First Compute Instance After account verification, you will be directed to the Computes dashboard. ### Start the Creation Process Click the **New Compute** button to open the compute creation page. ### Configure Your Instance You will need to make several configuration choices. Here are the key decisions: #### 1. Choose Your Operating System Select the Linux distribution you want to run. Currently, we offer Ubuntu 22 LTS and Ubuntu 24 LTS. Additional distributions (Debian and others) will be available in the coming months. Both Ubuntu versions are Long Term Support (LTS) releases, making them reliable choices for production applications. #### 2. Select Instance Specifications Choose your compute specifications based on your workload: * **CPU:** Number of processing cores * **RAM:** Memory allocation * **Storage:** Disk space Pricing appears next to each configuration option. Costs are shown in Rwandan Francs (RWF). Start with smaller specifications for testing. You can always create new instances with different specs as your needs grow. #### 3. Add Public IP Address (Recommended) Enable the public IP option to make your instance accessible from the internet. **Additional Cost:** Public IP addresses are billed separately from compute resources. This is required for SSH access from outside the Strettch Cloud network. Check current pricing in your dashboard. Without a public IP, you can only access your instance through the web console or by setting up a VPN. #### 4. Set Root Password Create a secure password for the root user account. **Save Your Password:** Strettch Cloud does not send password reminders via email. Store your password in a secure location. If you forget it, you can reset it using web console access. #### 5. Name Your Instance Give your compute instance a descriptive name that helps you identify its purpose (e.g., "production-api", "testing-server", "wordpress-site"). ### Complete the Creation Review your configuration and verify you have sufficient account balance. Click **Create Compute** to provision your instance. **Insufficient Balance:** If you do not have enough credits, you will be prompted to add funds before the instance can be created. See [Paying Your Bill](/faqs/paying-your-bill) for payment options. Instance creation typically takes 1-2 minutes. You will be redirected to the Computes dashboard where you can monitor the provisioning status. *** ## Step 3: Access Your Instance Once your instance is running, you have two ways to access it. ### Option 1: Web Console Access The web console provides browser-based terminal access to your instance. This works for all instances regardless of network configuration. 1. Click on your compute instance name in the dashboard 2. Click the **Console** button in the left menu 3. A new browser tab opens with a terminal interface You will be automatically logged in—no password required. This is handled securely by our agent running on your instance. The web console is ready to use immediately after your instance is created. ### Option 2: SSH Access SSH provides direct terminal access from your local computer. This requires a public IP address. Open your terminal and run this command: ```bash theme={null} ssh root@ -p 222 ``` Replace `` with the IP address shown on your compute details page. **Example:** ```bash theme={null} ssh root@41.74.168.123 -p 222 ``` When prompted, enter the root password you created during setup. **Port 222:** Strettch Cloud uses port 222 instead of the default port 22 for SSH access due to a firewall restriction from our upstream internet provider. This applies to most connections. However, if you are connecting from within certain networks (such as MTN in Rwanda), you may be able to connect using the default port 22 without specifying `-p 222`. **VPN Required for Private Instances:** If you did not add a public IP, SSH access requires setting up a VPN connection to the Strettch Cloud network. Use the web console instead for immediate access. You now have a running compute instance on African infrastructure with full terminal access. *** ## Next Steps Your instance is ready for use. Here are recommended next actions: Configure DNS records to direct your domain to your new instance Add collaborators and assign roles for team-based infrastructure management View real-time metrics for CPU, memory, network, and disk usage Understand billing, payment methods, and how to manage your account balance *** ## Getting Help If you encounter issues during setup or have questions: * **Email Support:** [cloud@strettch.com](mailto:cloud@strettch.com) * **Documentation:** Browse our [complete guides](/guides/computes) * **Platform Status:** [cloud.strettch.com](https://cloud.strettch.com) Our support team is based in Africa and familiar with local infrastructure challenges. # Managing Compute Instances Source: https://docs.cloud.strettch.com/guides/computes Create, connect to, and manage your SC Compute instances with confidence ## Creating Your First Compute Instance **Problem**: How do I provision a new server with the right specifications for my application? **Why it matters**: Choosing the correct configuration upfront prevents performance issues and unnecessary costs later. Navigate to the **Computes** tab and click **New Compute** to begin. You'll configure your instance through six steps: Select a hosting location for your server. The location you choose affects network latency and performance for your users. Select a location closest to where your primary traffic originates. Select an operating system image for your compute. 
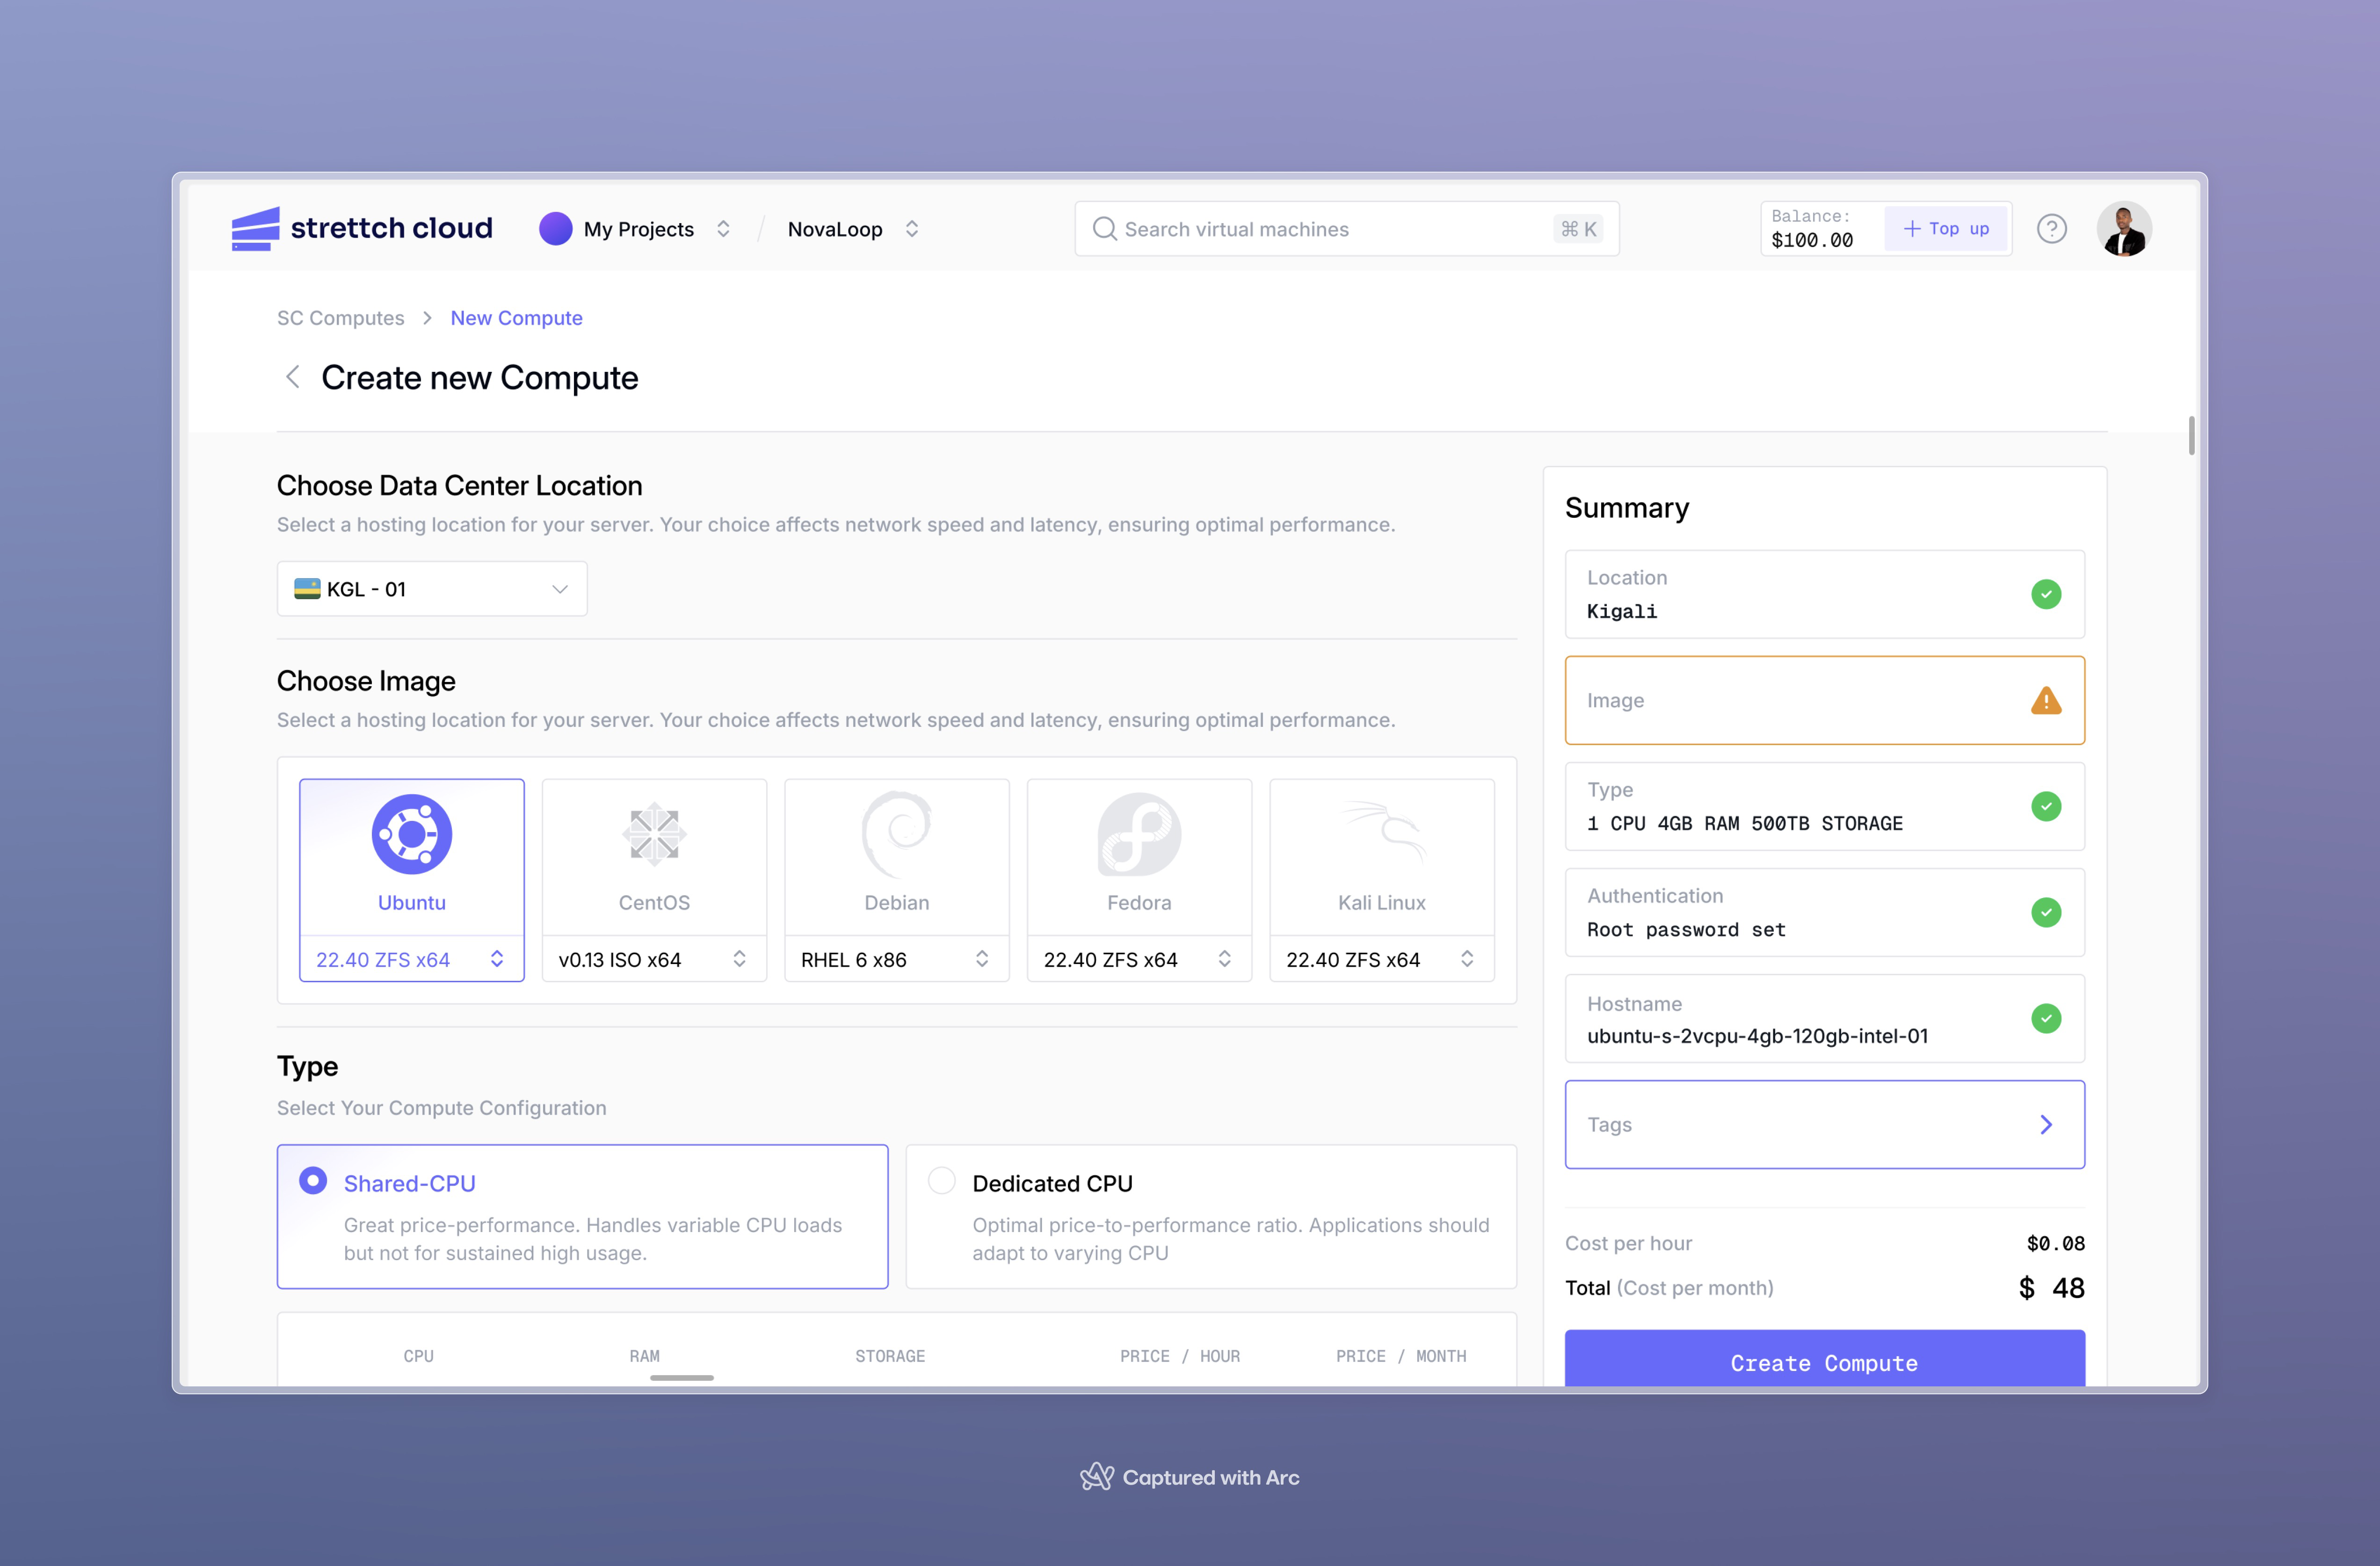
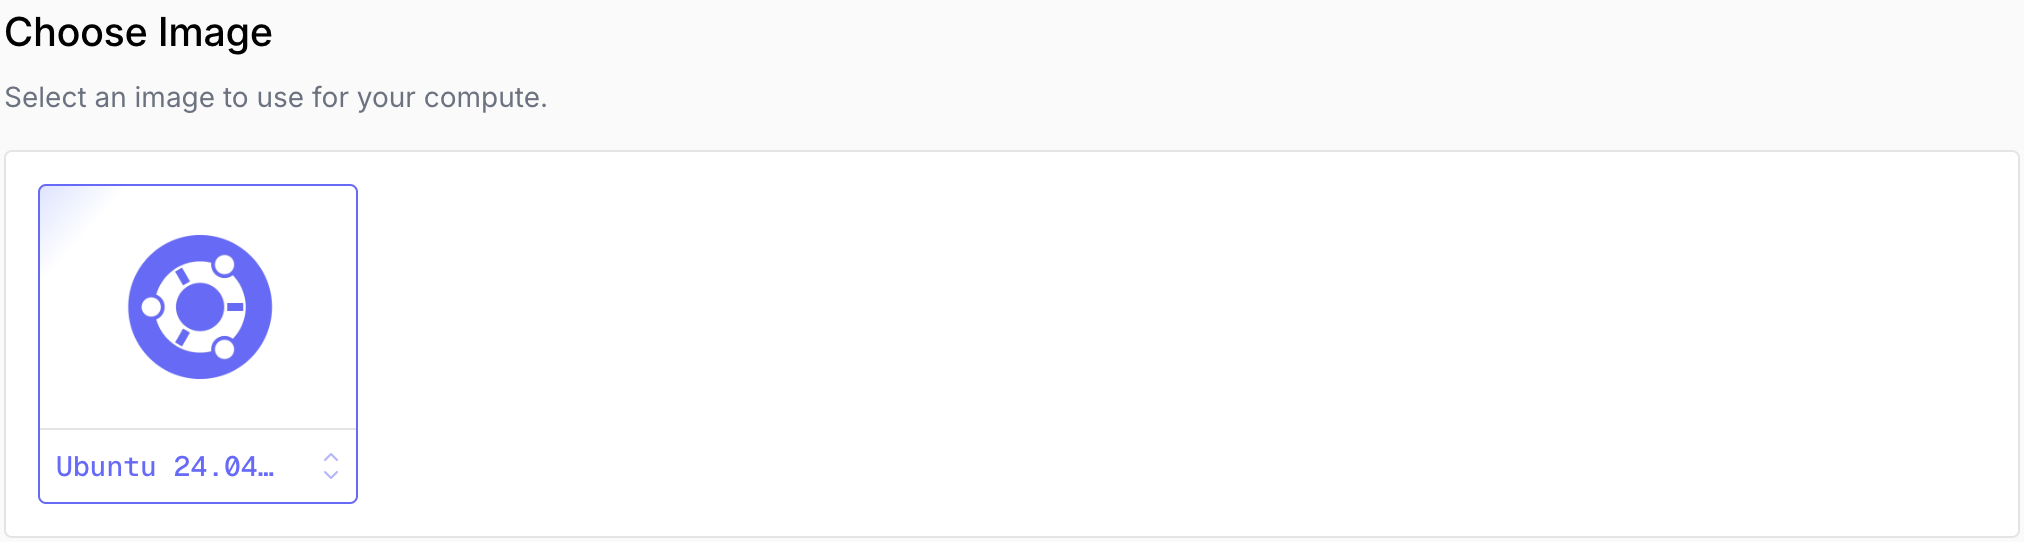
Available images include popular Linux distributions. Choose based on your application requirements and team familiarity. Select your compute configuration: `shared` or `dedicated` CPU. **
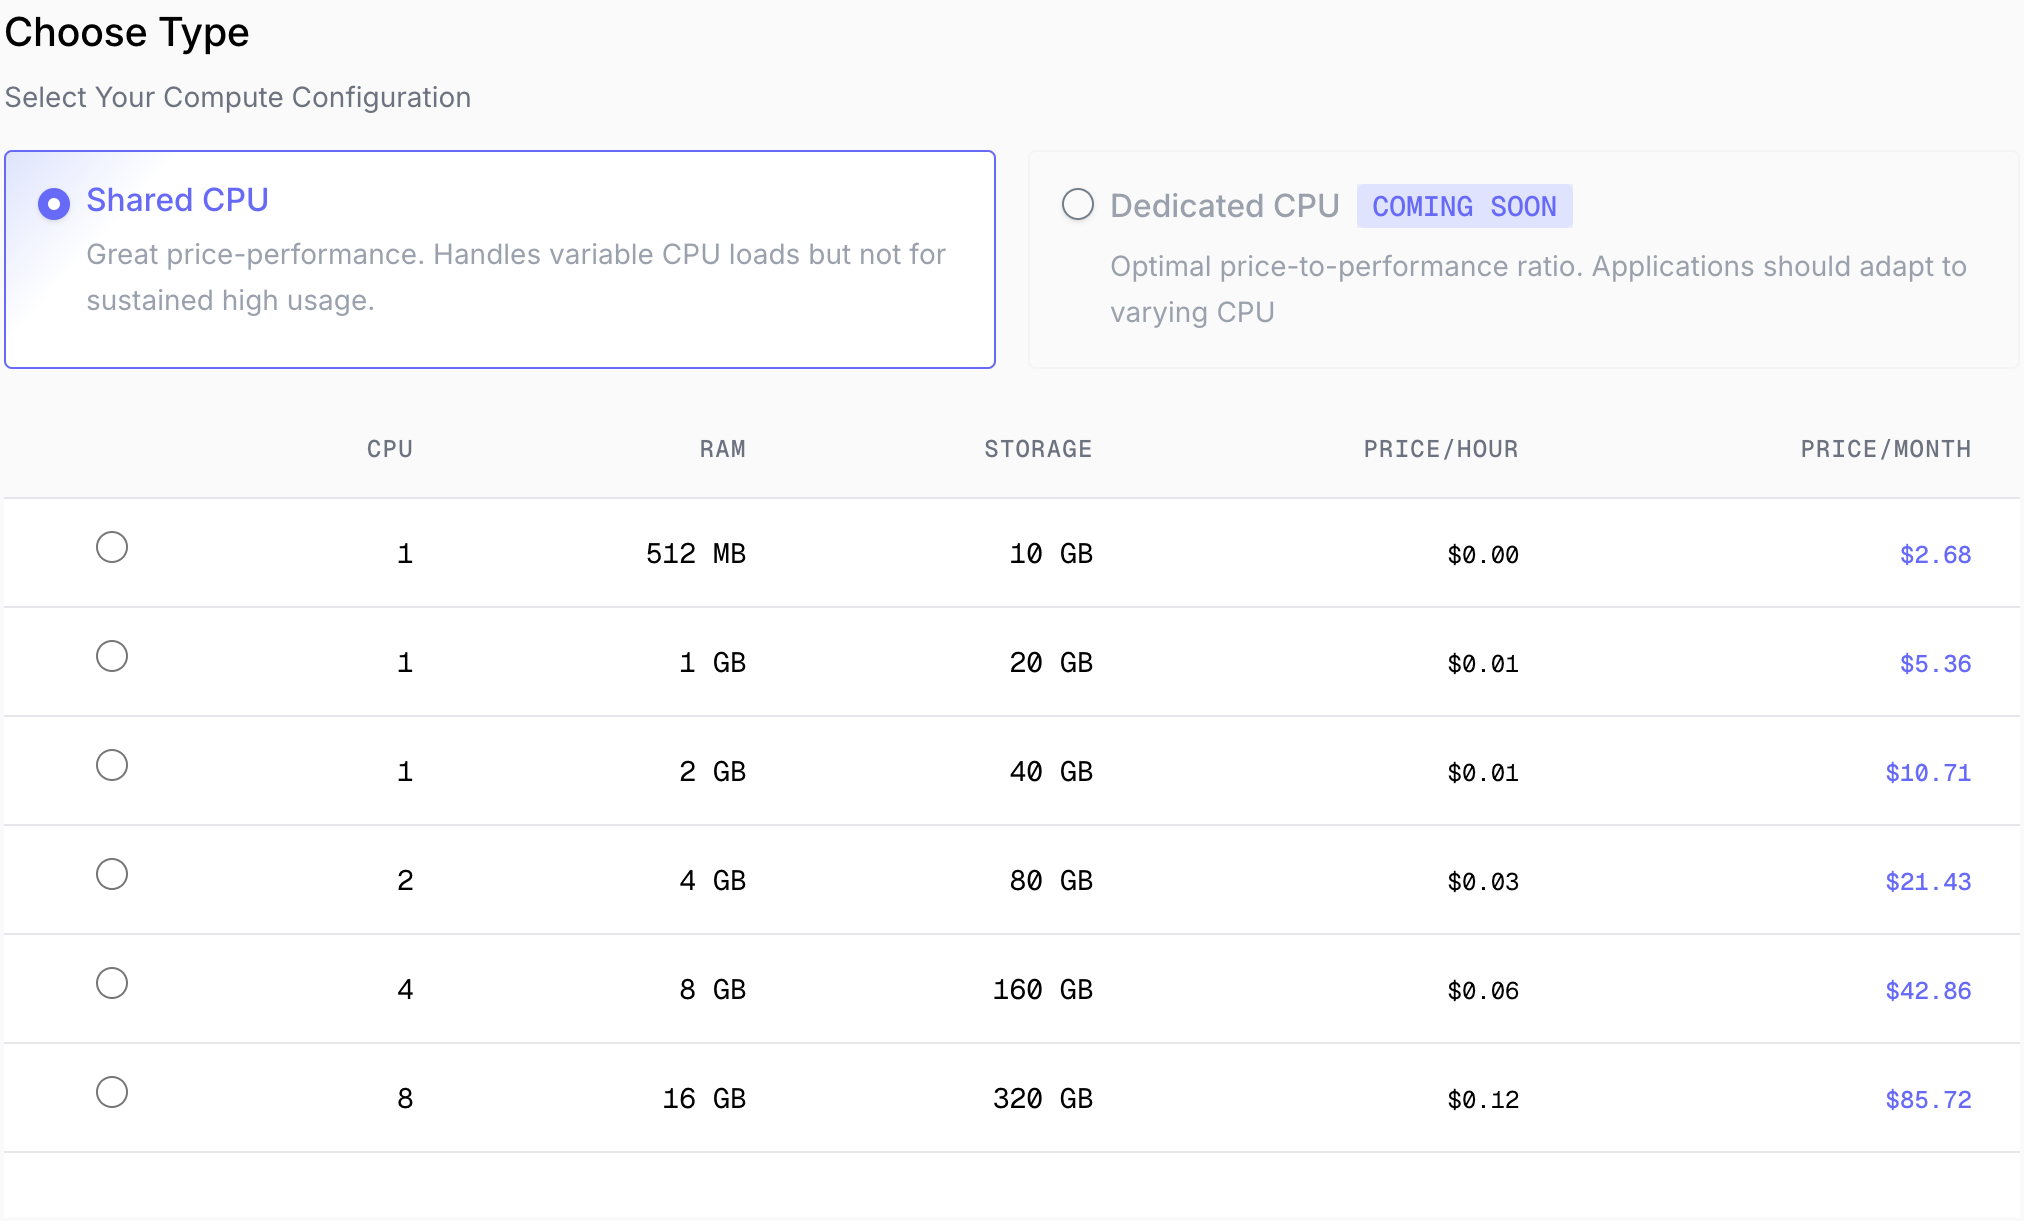
Shared CPU**: Cost-effective for applications with variable load patterns **Dedicated CPU**: Consistent performance for production workloads After choosing the type, specify your compute specs: **CPU**, **RAM**, **Storage**. Pricing is displayed alongside each configuration so you can see costs in real-time. Create a secure password for root user access. Store your password securely using a password manager. You will not receive an email with your compute details or password. If you lose this password, you'll need to reset it through console access. **Compute Name**: Give your compute an identifiable name that describes its purpose (e.g., "api-production", "staging-web-server") **Add Tags (Optional)**: Organize and manage your computes with custom tags. Useful for filtering, cost allocation, or automation. Review your configuration and pricing, then click **Create Compute**. Your compute cost depends on the specs you selected. The price is shown during configuration. Ensure you have sufficient credits in your account to create the compute. Your compute will be provisioned within seconds. Once in the **Running** state, you can connect and start using it. *** ## Connecting to Your Compute Instance **Problem**: How do I access my compute instance to install applications and manage services? ### Using the Web Console Access your compute through a browser-based console without needing any SSH client software. Click your compute name from the dashboard, then click **Console** in the left menu. The [SC Agent](/agents/sc-agent) is automatically installed on your compute. It will be ready within a few minutes of compute creation. The SC Agent enables browser-based console access. You can start using the console as soon as the agent installation completes. Once the console loads, you'll have a full terminal interface to your compute. Enter your root password to log in. ### Using SSH Access Connect directly via SSH from your local terminal for a native command-line experience. Locate your compute's public IP address on the compute details page in the dashboard. Open your terminal and connect using this command: ```bash SSH connection theme={null} ssh root@your-public-ip -p 222 ``` Replace `your-public-ip` with your actual compute IP address. **Example:** ```bash Example theme={null} ssh root@192.0.2.1 -p 222 ``` **Port 222:** Strettch Cloud uses port 222 instead of the default port 22 for SSH access due to a firewall restriction from our upstream internet provider. This applies to most connections. However, if you are connecting from within certain networks (such as MTN in Rwanda), you may be able to connect using the default port 22 without specifying `-p 222`. When prompted, enter the root password you created during compute setup. If you've forgotten your root password, reset it using console access through the web dashboard. *** ## Understanding Networking **Problem**: How do I make my compute instance accessible from the internet, and when should I use public vs private networking? **Why it matters**: Proper network architecture significantly improves security by limiting attack surface and helps reduce costs by only paying for public IPs where needed. ### Public IP Addresses (Optional) By default, compute instances are **not** assigned a public IP address. They remain in a private network, inaccessible from the internet but able to communicate with other instances in your team. #### When You Need a Public IP You need a public IP address when your instance must: * **Receive incoming connections** from the internet (web servers, APIs, public-facing services) * **Be accessed via SSH** directly from your local machine * **Serve as an entry point** to your infrastructure (reverse proxies, load balancers) #### Cost Public IP addresses are billed separately from compute resources. The pricing for public IPs can be found in your dashboard when creating a compute instance. Check the current rates before enabling this option. #### How to Attach a Public IP When creating a compute instance, you'll see an option to attach a public IP: 
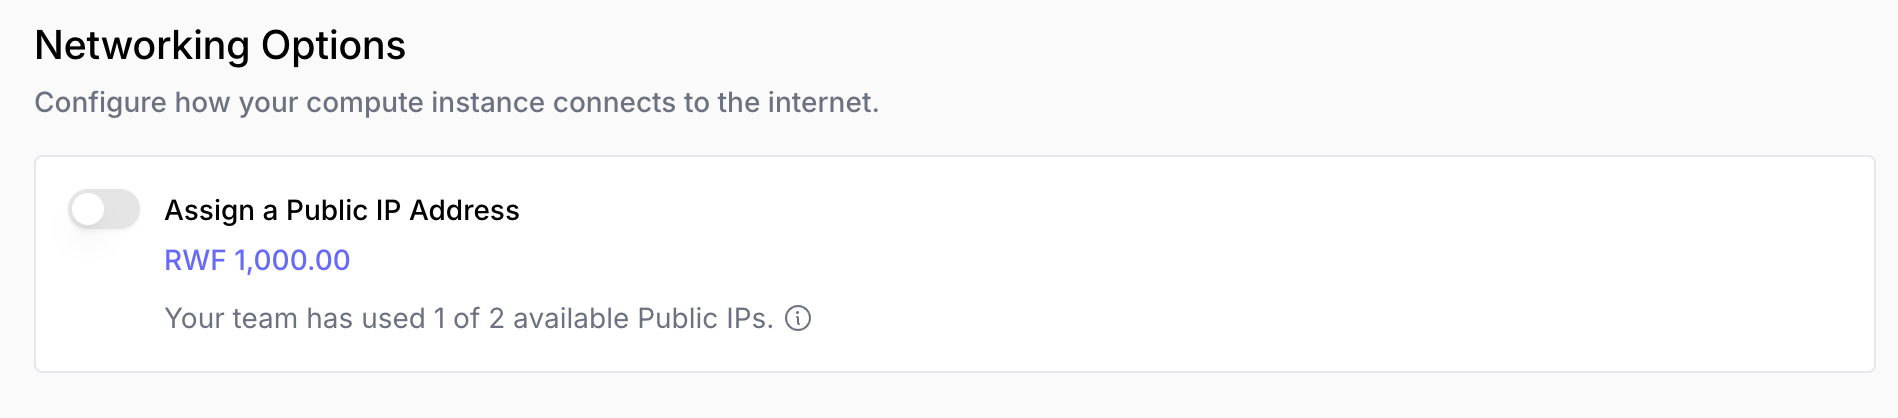
Simply check the box to attach a public IP to your instance. ### Private Network Architecture (Recommended for Security) **Problem**: How can I improve security while running multiple services? **Best practice**: Use a single public-facing instance as a gateway, keeping your application servers private. #### Example Architecture Imagine you're running a web application with these components: **
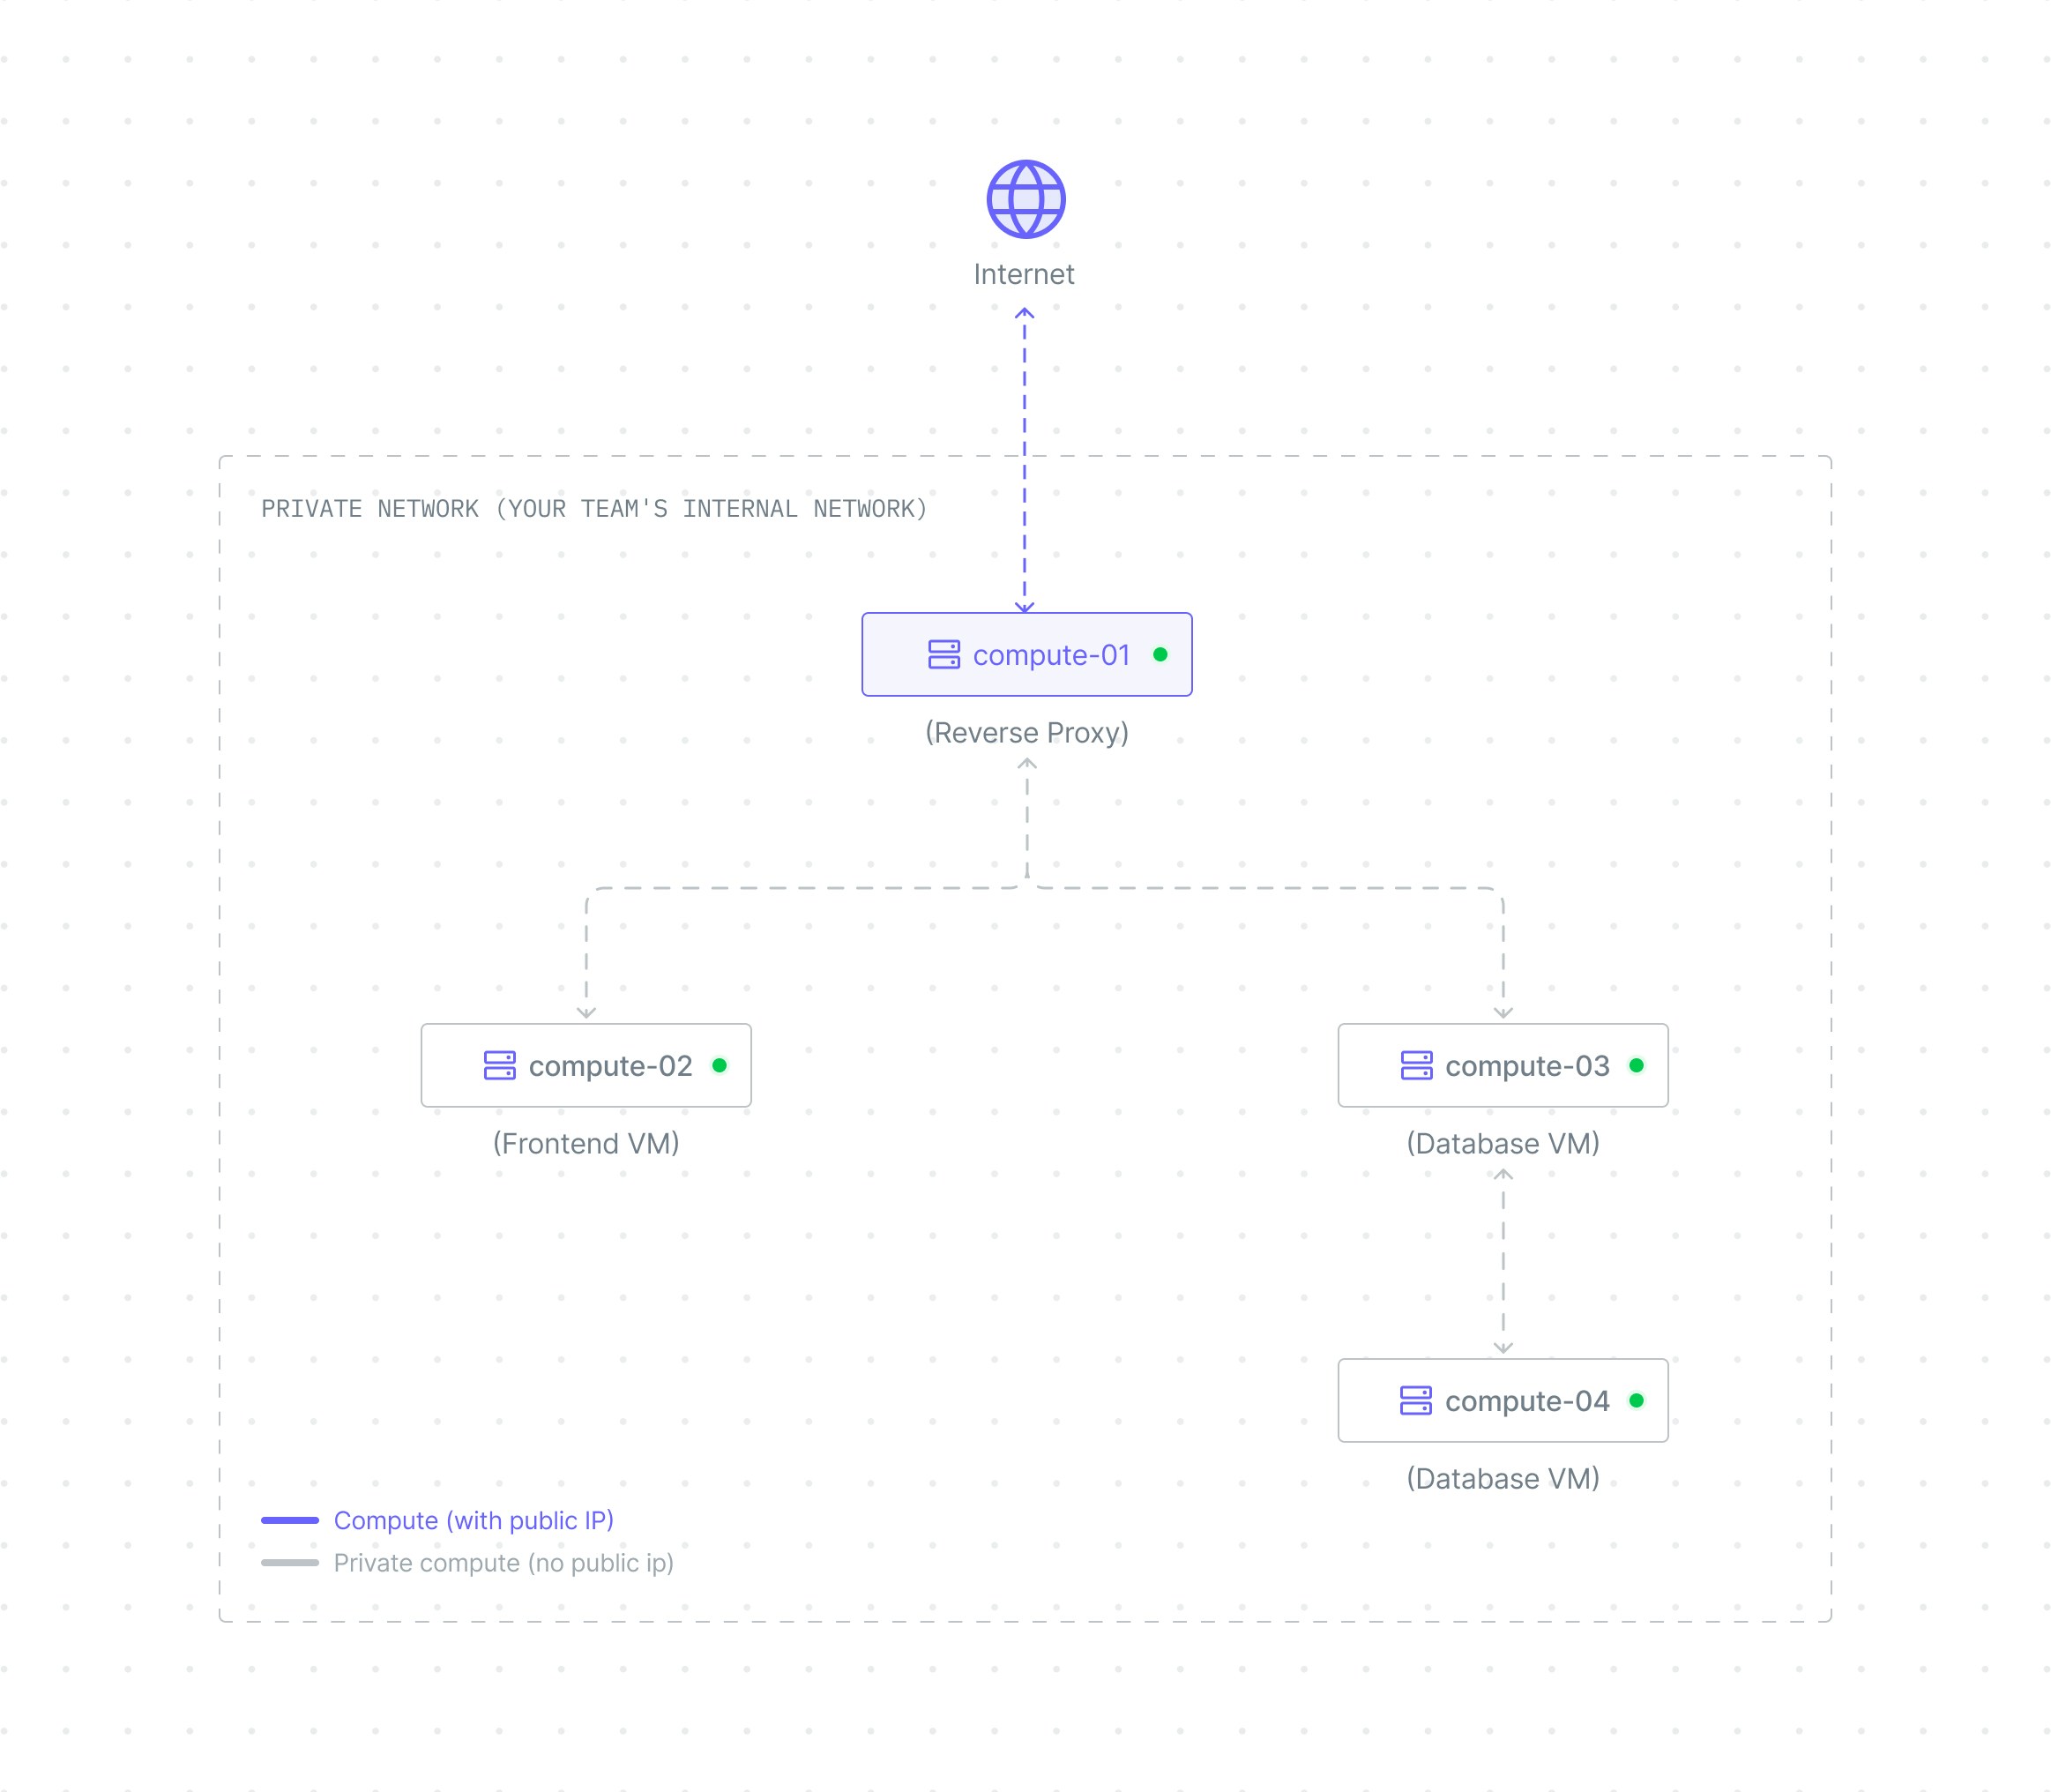
How this architecture works:** **Private Network (Foundation)** * All computes exist in a secure private network where they can communicate with each other **Public IP Assignment (Optional)** * **Reverse Proxy**: Has a public IP attached, making it accessible from the internet and able to route traffic to private services * **Frontend, Backend, Database**: No public IPs attached, so they remain inaccessible from the internet but can communicate within the private network **Benefits of this approach:** 1. **Enhanced Security** - Only one compute is exposed to the internet, reducing attack surface 2. **Cost Savings** - Pay for only one public IP instead of multiple (public IPs are billed separately) 3. **Centralized Public Security** - Configure internet-facing firewalls, SSL certificates, and security rules in one place 4. **Simplified Management** - Update public security measures on one compute instead of multiple *** ## Monitoring Performance and Health **Problem**: How do I know if my compute instance is performing well or experiencing issues? **Why it matters**: Proactive monitoring helps you identify performance bottlenecks, plan capacity upgrades, and troubleshoot issues before they impact users. Click on your compute name in the **Computes** tab to access detailed monitoring and management.
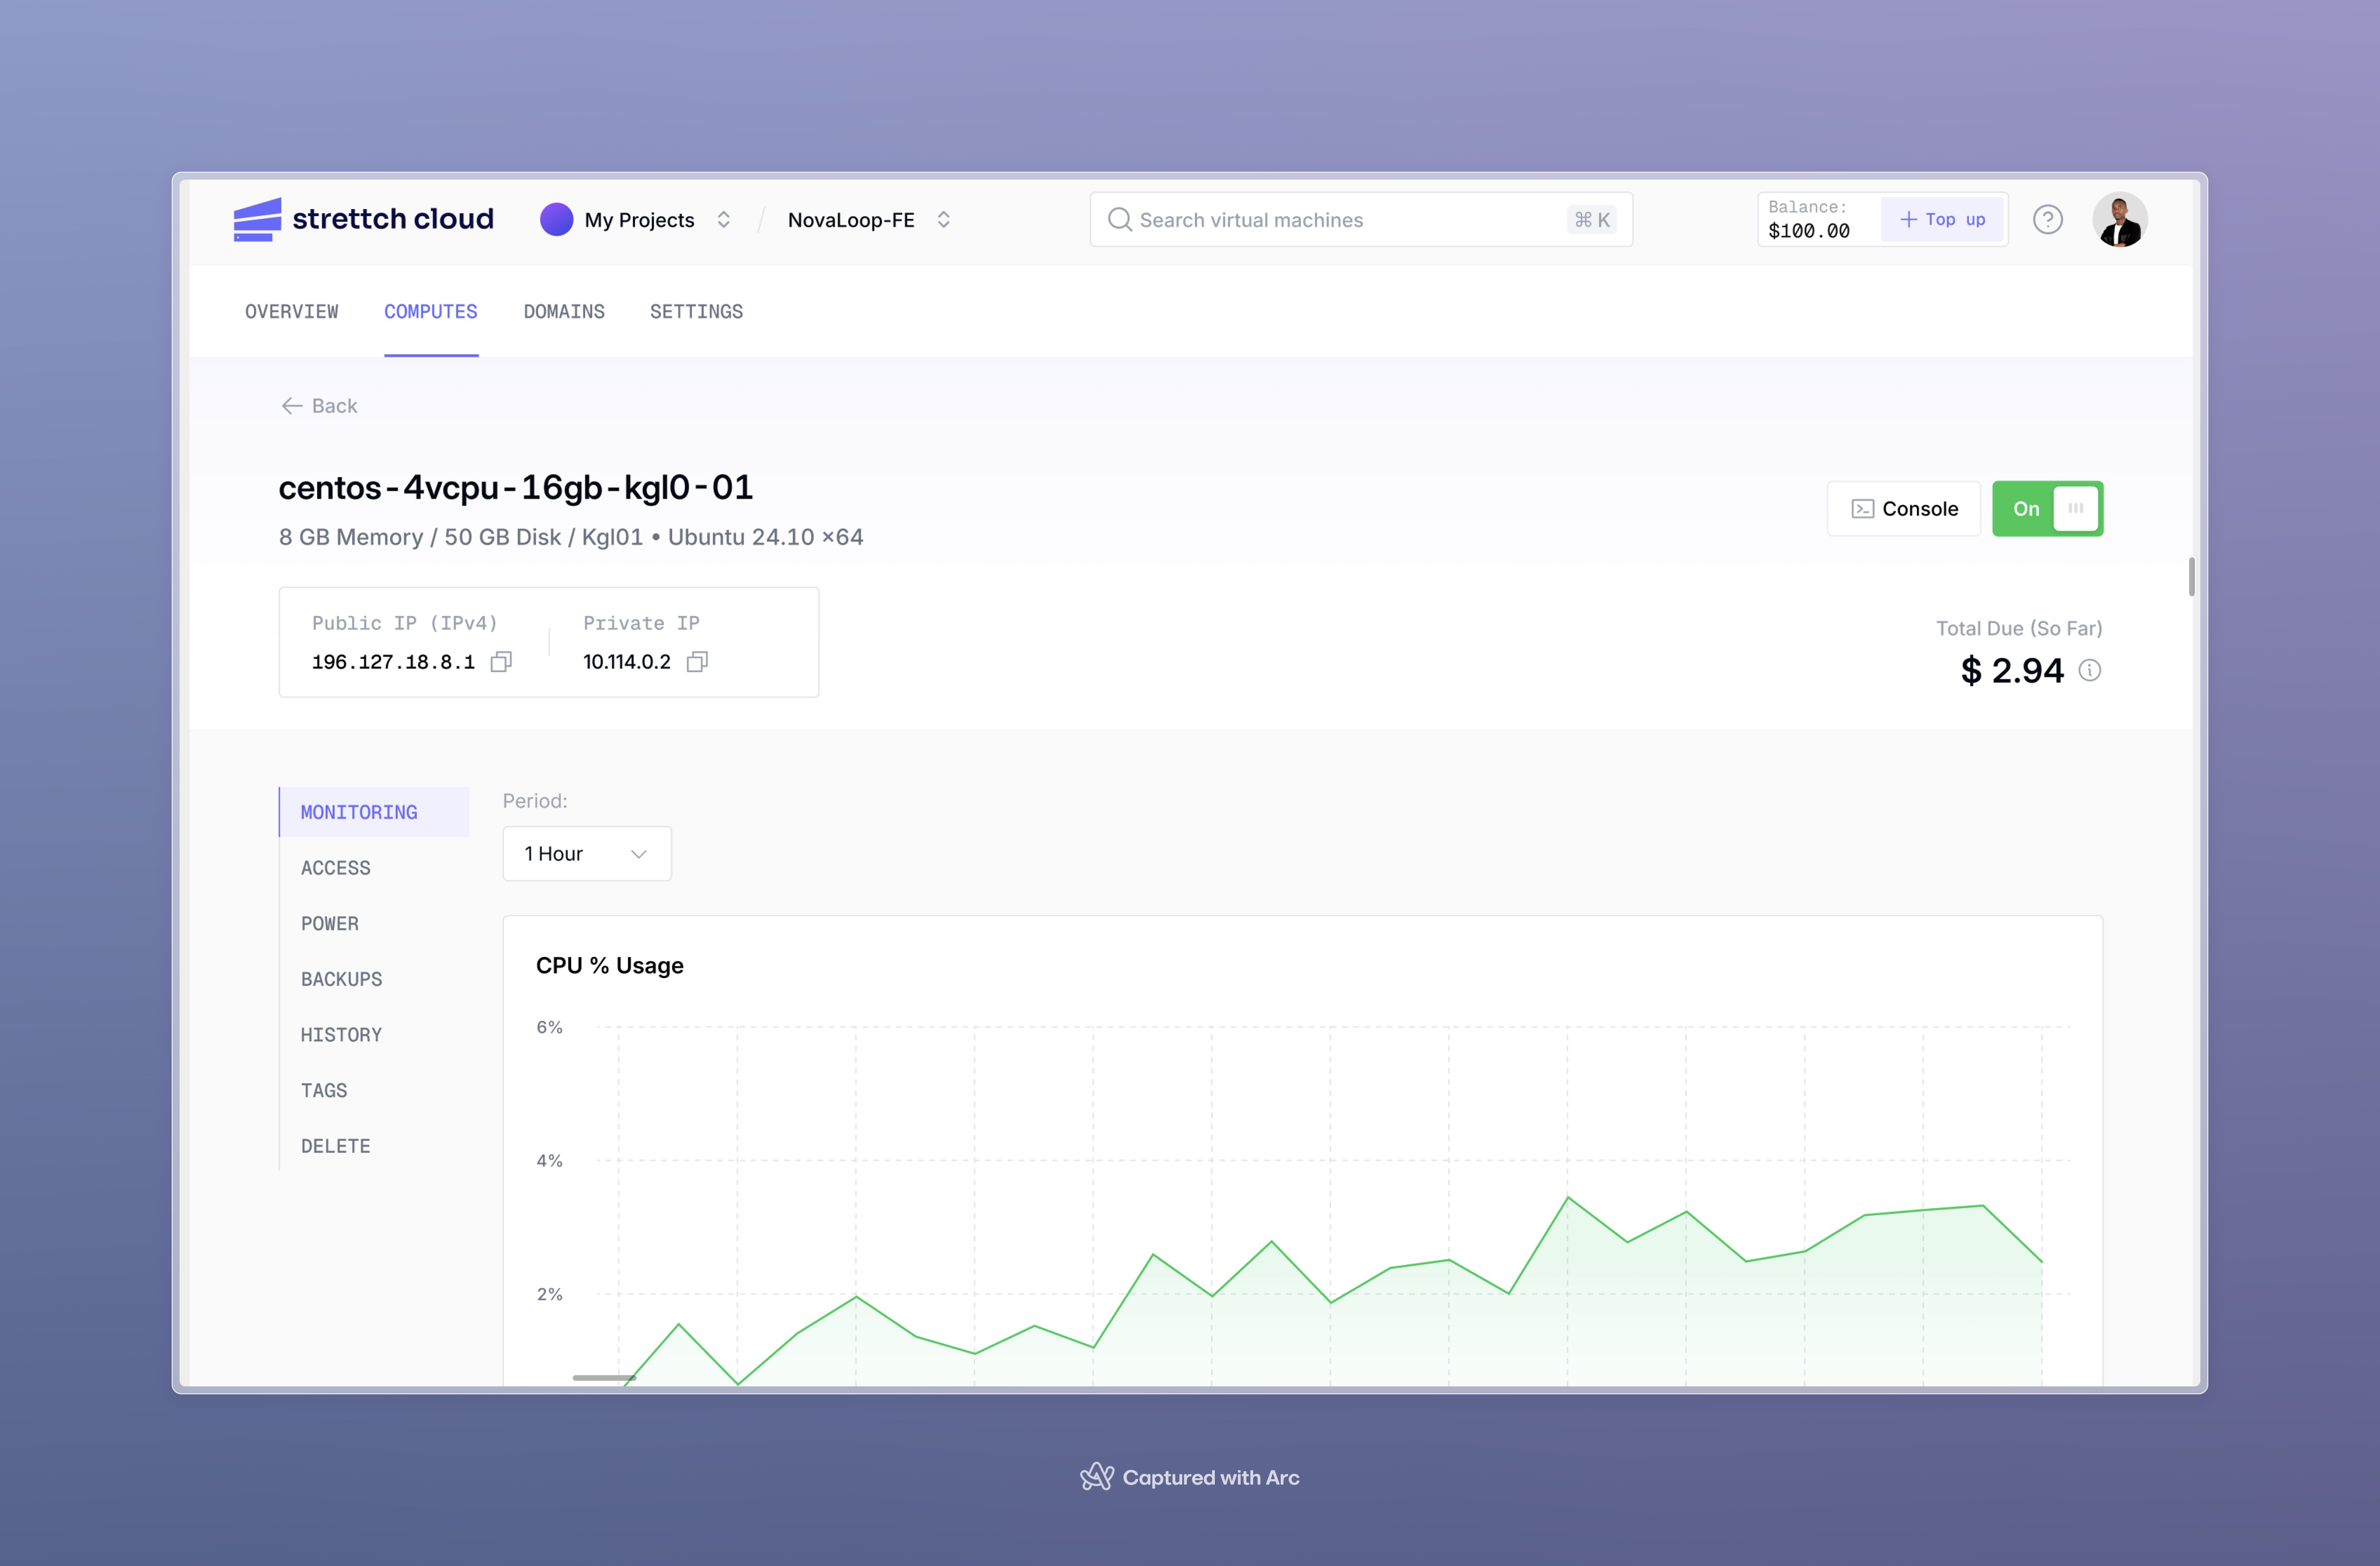
 ### Available Metrics Your compute includes five real-time performance graphs that help you understand resource utilization: | Metric | What It Shows | What to Watch For | | ------------- | ------------------------------------------------------------- | ---------------------------------------------------------- | | **Memory** | Memory usage over time | Consistently high usage (>90%) indicates you need more RAM | | **CPU Usage** | Processing power utilization (user jobs and system processes) | Sustained high CPU (>80%) suggests you need more CPU cores | | **Disk I/O** | Read and write operations in MB/s | High I/O wait times can slow down applications | | **Network** | Inbound and outbound traffic (packets) | Unexpected spikes may indicate traffic anomalies | | **Load** | System load average (number of processes waiting for CPU) | Load higher than CPU count suggests resource contention | ### Time Range Options View graphs for different time periods to understand short-term issues or long-term trends: * **1 hour** - Real-time troubleshooting * **6 hours** - Recent performance patterns * **24 hours** - Daily usage cycles * **7 days** - Weekly trends * **30 days** - Monthly patterns and capacity planning Hover over any graph to see exact metrics at specific points in time. ### SC Metrics Agent The [SC Metrics Agent](/agents/sc-metrics-agent) automatically installs with your compute to collect performance data. This agent runs in the background and sends metrics to the dashboard for visualization. If you uninstall the SC Metrics Agent, monitoring data collection will stop and graphs will be unavailable. Only remove this agent if you're using alternative monitoring solutions. *** ## Managing Compute Power States **Problem**: How do I control when my compute instance is running or stopped? ### Turning Your Compute ON or OFF Click your compute name from the dashboard. Click the switch button next to the Console button. 
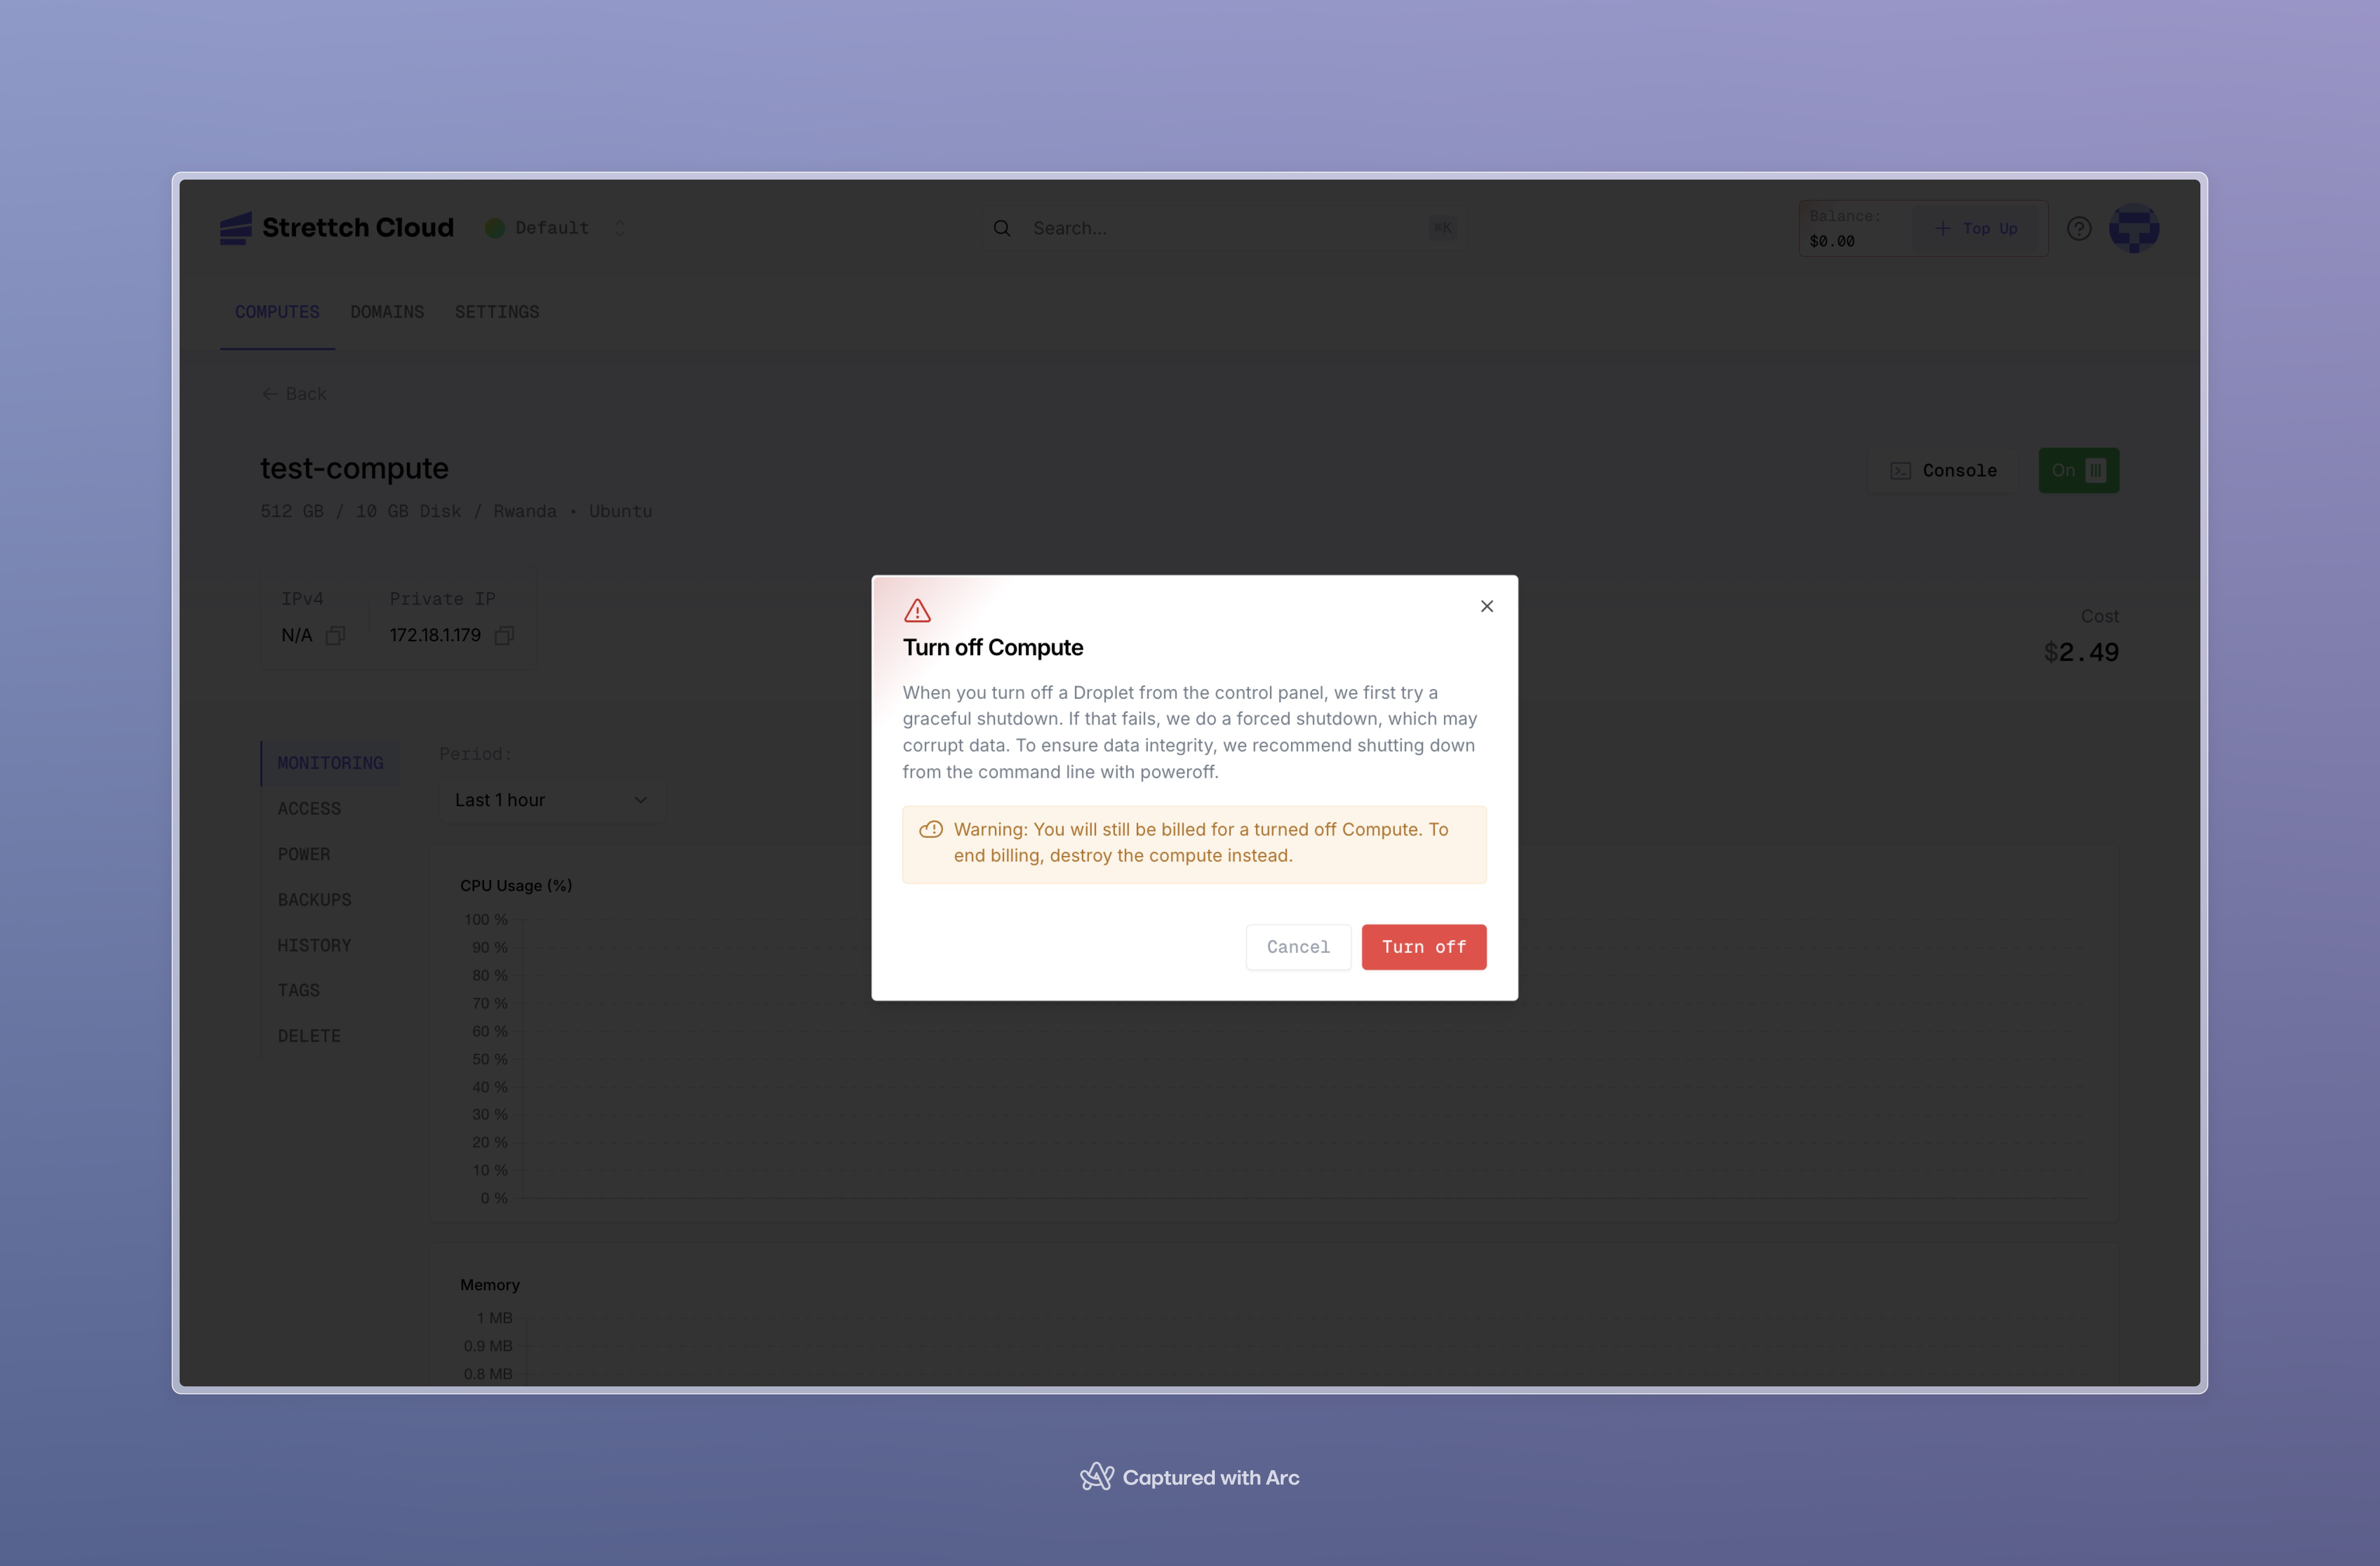
The system will attempt a graceful shutdown first. If that fails, it will force shutdown. ### Graceful Shutdown from Command Line For maximum data integrity, shut down from within your compute instance: ```bash Graceful shutdown theme={null} poweroff ``` This ensures all running processes close properly and data is written to disk before shutdown. **Billing continues for powered-off computes.** Stopped instances still reserve resources (CPU, RAM, storage) and incur charges at the same rate. To stop billing completely, you must destroy the compute instance. *** ## Best Practices **Problem**: How do I ensure my compute instances are secure, performant, and cost-effective? **Why it matters**: Following best practices prevents security breaches, performance issues, and unexpected costs. ### Security **Use SSH Keys Instead of Passwords** * SSH keys are more secure than password authentication * Generate a key pair locally and add your public key to `~/.ssh/authorized_keys` * Disable password authentication in `/etc/ssh/sshd_config` **Keep Your System Updated** * Regularly update your operating system and packages * Run `apt update && apt upgrade` (Ubuntu/Debian) or equivalent for your OS * Subscribe to security mailing lists for your distribution **Configure a Firewall** * Use `ufw` (Uncomplicated Firewall) or `iptables` to restrict access * Only open ports that your applications actually need * Consider using port 222 for SSH (as configured) to avoid automated scanners **Limit Root Access** * Create a non-root user for daily operations * Use `sudo` for administrative tasks * Only use root when absolutely necessary ### Performance **Monitor Resource Usage** * Check your monitoring graphs regularly * Set up alerts for sustained high CPU or memory usage * Plan upgrades before hitting resource limits **Choose the Right Instance Type** * Use shared CPU for development and staging * Use dedicated CPU for production workloads * Start small and scale up based on actual usage **Optimize Application Performance** * Profile your applications to find bottlenecks * Use caching where appropriate (Redis, Memcached) * Optimize database queries and indexes ### Cost Management **Right-Size Your Instances** * Don't over-provision resources "just in case" * Review metrics after a few weeks and adjust specifications * Scale up only when metrics consistently show resource constraints **Destroy Unused Instances** * Delete development or testing instances when not in use * Remember: stopped instances still incur charges * Use tags to identify instances that can be safely destroyed **Plan for Growth** * Monitor usage trends over 30 days * Anticipate capacity needs before hitting limits * Consider reserved instances for long-running workloads (if available) *** ## Need Help? Contact our [support team](mailto:cloud@strettch.com) or visit [our site](https://cloud.strettch.com). # Introduction Source: https://docs.cloud.strettch.com/index Get started with Strettch Cloud, infrastructure built for scale and affordability export const HeroCard = ({imageSrc, imageSrcDark, title, description, href}) => { return {title} {title}

{title}

{description}
; };
Strettch Cloud hero background Strettch Cloud hero background

Documentation

Get started with Strettch Cloud, infrastructure built for scale and affordability
# Overview Source: https://docs.cloud.strettch.com/overview Africa-first cloud infrastructure built for performance, affordability, and data sovereignty ## Building Internet Applications in Africa If you are building digital products in Africa, you face challenges that developers in other regions rarely encounter. Your application might feel slow despite being well-optimized. Your cloud bills might change unpredictably due to currency fluctuations. Compliance with local data protection laws might require working with unreliable providers. Strettch Cloud addresses these challenges. ## What Strettch Cloud Provides Strettch Cloud is an Infrastructure-as-a-Service (IaaS) platform that provides cloud computing across Africa. We offer compute instances, DNS management, and networking—similar to AWS or DigitalOcean—but with infrastructure located in African countries. All backed by local hosting, local currency billing, and local support. The name "Strettch" (pronounced /stretʧ/, like "stretch") represents our core belief: there's always more on the other side of "good enough." The double 'tt' is intentional—it emphasizes that extra push, the additional effort most stop short of. When you think you've done enough, stretching just a bit more often reveals what separates the exceptional from the average. Strettch Cloud is a product of [strettch.com](https://strettch.com/), built on this philosophy of continuous improvement. *** ## Problems Strettch Cloud Solves African businesses have two main options for cloud infrastructure: global providers like AWS and Google Cloud, or local providers. Both options create significant problems. Global providers offer reliable infrastructure but introduce high latency and currency risk. Local providers eliminate latency but often deliver unreliable service at premium prices. ### Reducing Latency for Better User Experience High latency makes applications feel slow and frustrates users. The closest AWS region to many African countries is in Cape Town, South Africa. From Rwanda, this creates around 110ms of delay on every request, with latency sometimes peaking to 200ms during network congestion. ```bash theme={null} # Ping from Rwanda to AWS Cape Town (the closest AWS region) root@docs-compute:~# ping -c 5 13.247.110.111 PING 13.247.110.111 (13.247.110.111) 56(84) bytes of data. 64 bytes from 13.247.110.111: icmp_seq=1 ttl=40 time=111 ms 64 bytes from 13.247.110.111: icmp_seq=2 ttl=40 time=110 ms 64 bytes from 13.247.110.111: icmp_seq=3 ttl=40 time=110 ms 64 bytes from 13.247.110.111: icmp_seq=4 ttl=40 time=110 ms 64 bytes from 13.247.110.111: icmp_seq=5 ttl=40 time=111 ms --- 13.247.110.111 ping statistics --- 5 packets transmitted, 5 received, 0% packet loss, time 4006ms rtt min/avg/max/mdev = 110.341/110.479/110.578/0.079 ms ``` Modern applications make hundreds of requests per page load. At 110ms per request (and higher during peak times), these delays compound into a noticeably slow user experience. Countries like Rwanda, Ghana, and Kenya have no nearby cloud infrastructure. **Our Solution:** Strettch Cloud operates infrastructure in African countries, starting with Rwanda. This reduces latency to 10-30ms. Your users get the responsive experience they expect. ### Eliminating Currency Risk from Cloud Bills Running a business in local currency while paying cloud bills in USD creates financial uncertainty. Currency fluctuations directly impact your operating costs. In Rwanda, the exchange rate moved from 1,200 RWF per USD to 1,500 RWF per USD. A business with a \$20,000 annual cloud bill saw costs increase from 24 million RWF to 30 million RWF. This is a 6 million RWF increase with no change in usage. **Our Solution:** Strettch Cloud bills in local currency. In Rwanda, you pay in Rwandan Francs (RWF). You can use local payment methods including mobile money. Your budget stays predictable because cloud costs are not exposed to currency fluctuations. ### Simplifying Data Sovereignty Compliance Many African countries require that certain data be stored within national borders. Meeting these requirements with global cloud providers is complex and expensive. Local providers keep data in-country but often deliver unreliable service. Simple requests like creating DNS records can take a week. Some providers offer only 98% uptime compared to the industry standard of 99.9%. Manual processes create bottlenecks. Costs are often 2-3x higher than global alternatives. **Our Solution:** Strettch Cloud hosts infrastructure in African countries, so your data stays local automatically. You remain compliant with data sovereignty requirements without sacrificing reliability or control. Our infrastructure is automated, designed for high availability, and priced affordably. ### Enabling Multi-Country Operations Expanding across multiple African countries means navigating different regulations, providers, and compliance requirements in each location. Operating in 5 African countries typically requires contracting with 5 different local providers, managing 5 separate infrastructures, dealing with 5 different billing systems, and coordinating with 5 local teams. This complexity creates massive overhead and uncertainty. **Our Solution:** Strettch Cloud provides a unified platform across African countries. As we expand to new regions, you will be able to deploy infrastructure in multiple countries through a single interface. One platform handles multi-country compliance, billing, and operations. *** ## What You Can Build ### Running Applications and Websites Deploy virtual machines (compute instances) to run your applications, websites, APIs, and databases. Choose from multiple instance sizes and Linux distributions. Access your instances via SSH or web console. Pricing starts at 3,999 RWF per month (approximately \$2.76 USD). [Learn more about Compute →](/services/computes) ### Managing Your Domains Point your domains to your infrastructure using our DNS management system. We support all standard DNS record types including A, AAAA, CNAME, MX, TXT, and NS records. DNS changes propagate quickly. [Learn more about DNS →](/services/domains) ### Collaborating with Your Team Organize your cloud resources by team. Invite team members and assign roles (Owner, Admin, Member). Each team has its own billing and resource management. [Learn more about Teams →](/services/teams) *** ## Where Strettch Cloud Operates ### Current Region Strettch Cloud currently operates in Rwanda 🇷🇼 (MTN data center). We are expanding to additional African countries. ### Payment Options In Rwanda, you can pay in Rwandan Francs (RWF) using: * Mobile Money (MTN Mobile Money, Airtel Money) * Bank Transfer * Credit/Debit Cards Additional currencies will be supported as we expand to new countries. [View pricing details →](/faqs/paying-your-bill) *** ## Next Steps Ready to start using Strettch Cloud? Here is what to do next: Follow our quickstart guide to deploy a compute instance in minutes Learn about compute, DNS, and team management capabilities Review our pricing and payment options Contact our local support team for assistance # SC Compute Overview Source: https://docs.cloud.strettch.com/services/compute/overview Understanding compute resources in Strettch Cloud ## What is SC Compute? SC Compute is a virtual machine service that gives you access to remotely available servers over the internet. Think of it as renting a server in the cloud that you can use for whatever you need. Each compute instance comes with: * **Customizable specifications** - Choose CPU, RAM, and storage that fit your needs * **compute monitoring** - Track performance metrics in real-time * **UI management** - Control your instances (shutdown, reboot) directly from the dashboard * **Team collaboration** - Share compute resources with your team members *** ## Use Cases SC Compute instances can be used for virtually anything you would do with your own server. Common use cases include: * **Hosting websites and web applications** - Deploy your frontend and backend applications * **Running web APIs** - Serve REST APIs, GraphQL endpoints, or microservices * **Database hosting** - Run MySQL, PostgreSQL, MongoDB, or other databases * **Development and testing environments** - Spin up instances for testing and experimentation * **Batch processing and data analysis** - Run compute-intensive workloads * **Custom services** - Deploy any application or service that runs on Linux *** ## Resource Lifecycle **Problem**: What states can my resources be in, and what do they mean for access and billing? Different resource types may have different lifecycles. This section focuses primarily on **compute instances** as the most common example. ### Lifecycle States Here's the typical flow through lifecycle states: ``` Creating → Running ⟷ Stopped → Destroying → Destroyed ``` | State | Description | Web Dashboard | Resource Access (SSH/Console) | Billable? | Can Transition To | | ---------------------- | ------------------------------------------ | ------------- | ----------------------------- | --------- | -------------------- | | **Creating** | Initial provisioning when first created | Visible | Not accessible | No\* | Running | | **Running** | Normal operational state | Visible | Fully accessible | **Yes** | Stopped, Destroying | | **Stopped** | Instance stopped but resources reserved | Visible | Not accessible | **Yes** | Starting, Destroying | | **Starting/Rebooting** | Transitioning from Stopped or rebooting | Visible | Not accessible | **Yes** | Running | | **Destroying** | Brief destruction process (seconds) | Visible | Not accessible | No\* | Destroyed | | **Destroyed** | Final state - all data permanently deleted | Not visible | Not accessible | **No** | None (irreversible) | \*Creating and Destroying states are not billable due to their very brief duration (typically seconds to less than a minute). The **Stopped** state still incurs charges because resources remain reserved. To stop billing, you must **Destroy** the resource. ### Understanding the States **Creating**: When you first create a compute instance, it goes through a provisioning process where the system allocates resources, installs the operating system, and configures networking. This typically takes less than a minute. **Running**: This is the normal operational state where your instance is fully accessible. You can connect via SSH or the web console and use the compute resources. **Stopped**: When you stop an instance, it shuts down but all resources (CPU, RAM, storage) remain reserved for you. This means you continue to be billed at the same rate. The benefit is that you can quickly restart the instance without losing any data or configuration. **Destroying/Destroyed**: When you destroy an instance, all data is permanently deleted and resources are released. This is the only way to stop billing. Once destroyed, an instance cannot be recovered. *** ## Next Steps Now that you understand what SC Compute is and how the lifecycle works: * [Create your first compute instance](/guides/computes) * [Learn about SC Agent for web console access](/agents/sc-agent) * [Set up monitoring with SC Metrics Agent](/agents/sc-metrics-agent) * [Connect a domain to your compute instance](/guides/domains) # Managing DNS Source: https://docs.cloud.strettch.com/services/dns/managing-dns Register domains, configure nameservers, and manage DNS records on Strettch Cloud. ## Registering a Domain Before you can manage DNS records, you need to register a domain with Strettch Cloud DNS. **Important:** Strettch Cloud does not sell domain names. You must first purchase your domain from a domain registrar (such as Namecheap, GoDaddy, or Cloudflare). Once you own the domain, you can register it with Strettch Cloud to manage its DNS records. Go to your team's dashboard and select the **Domains** tab. Click **Register Domain**. Enter the domain address you want to register (e.g., `example.com`). Click **Confirm** to validate the domain availability. * If the domain name is invalid or unavailable, you'll see a notification. Choose a different domain name. * If the domain is valid, you'll move to the nameserver configuration step. ## Adding Nameservers to Your Domain Provider After validating your domain, configure your domain provider to use Strettch Cloud's nameservers. In the domain setup wizard, you'll see a table with Strettch Cloud nameservers. Click the **copy icons** to copy each nameserver: * `ns1.strettch.com` * `ns2.strettch.com` Log in to your domain registrar (where you purchased the domain). Navigate to your domain's DNS or nameserver settings. Replace the existing nameservers with the Strettch Cloud nameservers you copied. The exact steps vary by registrar. Common registrars include GoDaddy, Namecheap, and Cloudflare. Return to the Strettch Cloud domain setup wizard. Scroll down and click the **Activate domain** button to complete the registration. You must add Strettch Cloud's nameservers to your domain provider. Without this step, your domain will remain inactive and DNS records will not work. ## Verifying Domain Status After activating your domain, check its status to ensure proper configuration. After domain creation, you'll be redirected to the domains list for your team. Each domain shows its current status. Domain activation can take between **3 minutes** and **24 hours** depending on your domain provider's propagation speed. * **Activating**: Domain is waiting for nameserver propagation to complete * **Active**: Domain is fully operational and DNS records are working * **Inactive**: Domain failed to activate (nameservers not configured correctly) If a domain remains inactive beyond 24 hours, verify with your domain registrar that Strettch Cloud's nameservers (`ns1.strettch.com` and `ns2.strettch.com`) are correctly configured. ## Managing DNS Records Once your domain is active and using Strettch Cloud's nameservers, you can manage its DNS records. Your domain must use **Strettch Cloud's nameservers** for DNS records to work. If you're using a third-party domain registrar, ensure you've added our nameservers as described above. ### Supported Record Types Strettch Cloud DNS supports the following record types: | Record Type | Hostname Example | Description | | ----------- | ----------------------- | ------------------------------------------------------------------ | | **A** | `example.com` | Redirects to IPv4 address `192.0.2.1` | | **AAAA** | `example.com` | Redirects to IPv6 address `2001:0db8:85a3:0000:0000:8a2e:0370:733` | | **SRV** | `_sip._tcp.example.com` | Service located at `10 60 5060 sip.example.com` | | **TXT** | `_dmarc.example.com` | Returns `v=DMARC1; p=none; rua=mailto:dmarc@example.com` | | **MX** | `example.com` | Mail handled by `mail.example.com` | | **CNAME** | `blog.example.com` | Is an alias of `wiki.example.com` | ### Adding DNS Records On your team's dashboard, go to the **Domains** tab. Click on the domain you want to manage to open its Advanced Settings page. On the Advanced Settings page, click **Add new record**. Fill out the DNS Record form with the following information: **Name**: The prefix or subdomain for the record. For `www.example.com`, enter `www`. For the root domain, leave blank or use `@`. **Type**: Select the record type (`A`, `AAAA`, `CNAME`, `MX`, `TXT`, `SRV`, or `NS`). **Value**: The target value for the record (IP address, domain name, or text content). **TTL**: Time to live in seconds. Default is 60 seconds. Lower values mean faster propagation but more DNS queries. **Comment** (optional): Add a note explaining what this record is for. **Additional Fields**: Some records require extra data. For example, MX records need a priority value. Click **Create Record** to add the DNS record. Changes take effect immediately. ### Verifying DNS Records After adding or modifying DNS records, verify they're configured correctly. **Using Third-Party Tools** Use online tools to check DNS propagation globally: * [DNS Checker](https://dnschecker.org) * [DNS Map](https://dnsmap.io) These tools show how your DNS records appear in different regions worldwide. **Using Command Line** Check DNS records directly using the `dig` command: ```bash Check A record theme={null} dig A api.example.com +short ``` ```bash Check MX record theme={null} dig MX example.com +short ``` ```bash Check TXT record theme={null} dig TXT _dmarc.example.com +short ``` ```bash Check CNAME record theme={null} dig CNAME blog.example.com +short ``` The `+short` flag returns only the record value without additional information. ### Removing DNS Records On your team's dashboard, select the **Domains** tab. Click on the domain containing the record you want to delete. On the Advanced Settings page, locate the record you want to remove. Click the ellipsis menu **(⋯)** next to the record and select **Delete**. Follow the prompts to confirm deletion. The record will be removed immediately. ## Next Steps Learn about DNS concepts and how Strettch Cloud DNS works Deploy applications and connect them to your domains **Need help?** Contact our [support team](mailto:cloud@strettch.com) or visit [cloud.strettch.com](https://cloud.strettch.com). # DNS Overview Source: https://docs.cloud.strettch.com/services/dns/overview Enterprise-grade DNS with fast propagation for your domains. ## What is Strettch Cloud DNS? Strettch Cloud DNS is a managed DNS service that lets you host and manage DNS records for your domains. It provides enterprise-grade performance with fast propagation across the global network. When you use Strettch Cloud DNS, you point your domain to our nameservers (`ns1.strettch.com` and `ns2.strettch.com`). From that point, you manage all DNS records directly through the Strettch Cloud dashboard. ## Understanding DNS Basics ### What are Nameservers? Nameservers are servers that store DNS records and respond to DNS queries. They tell the internet where to find your website, email servers, and other services. When you use Strettch Cloud DNS, you configure your domain registrar to use our nameservers: * `ns1.strettch.com` * `ns2.strettch.com` ### What are DNS Records? DNS records are instructions that map domain names to IP addresses or other values. Each record type serves a specific purpose: | Record Type | Purpose | Example | | ----------- | ------------------------------------------------- | ------------------------------------------------ | | **A** | Maps domain to IPv4 address | `example.com` → `192.0.2.1` | | **AAAA** | Maps domain to IPv6 address | `example.com` → `2001:0db8:85a3::8a2e:0370:7334` | | **CNAME** | Creates alias from one domain to another | `blog.example.com` → `example.com` | | **MX** | Specifies mail servers for domain | `example.com` → `mail.example.com` | | **TXT** | Stores text information (verification, SPF, DKIM) | Domain verification strings, email policies | | **SRV** | Defines location of services | SIP, XMPP, and other service endpoints | | **NS** | Delegates subdomain to other nameservers | `api.example.com` → external DNS provider | ### What is DNS Propagation? DNS propagation is the time it takes for DNS changes to update across all DNS servers on the internet. Traditional DNS changes can take 24-48 hours to propagate globally. With Strettch Cloud DNS, changes are fast on our nameservers. However, clients may still cache old records based on the TTL (Time To Live) value you set. ### What is TTL? TTL (Time To Live) is the duration in seconds that DNS records are cached by DNS resolvers. A lower TTL means changes propagate faster but increases DNS queries. A higher TTL reduces queries but delays change propagation. Default TTL on Strettch Cloud DNS is 60 seconds, which balances performance with flexibility for updates. ## Next Steps Learn how to register domains, add nameservers, and manage DNS records Deploy applications that your DNS records can point to **Need help?** Contact our [support team](mailto:cloud@strettch.com) or visit [cloud.strettch.com](https://cloud.strettch.com). # Managing Teams Source: https://docs.cloud.strettch.com/services/teams/managing-teams How to invite members, manage permissions, and configure team settings ## Inviting Members to Your Team Add collaborators to your team so they can help manage resources. Open your team settings page from the dashboard. Input an email address and select a role: * **Member**: Can manage emails, domains, and webhooks * **Admin**: Has all Member permissions plus ability to invite users, update payments, and delete the team The new member will receive an email invitation to join the team. The invited member will appear under **Pending Invitations** until they accept the invite. *** ## Changing Team Avatar Customize your team's appearance with a custom avatar. Open your team settings page from the dashboard. Find the upload button next to the avatar placeholder. Select an image file to use as the team avatar. *** ## Switching Between Teams If you belong to multiple teams, you can switch between them to access different resources. In the top left corner of any Strettch Cloud page, click on the team name. A dropdown menu appears listing all teams you belong to. Select the team you want to switch to. *** ## Changing Member Roles As an admin, you can modify the roles of team members.
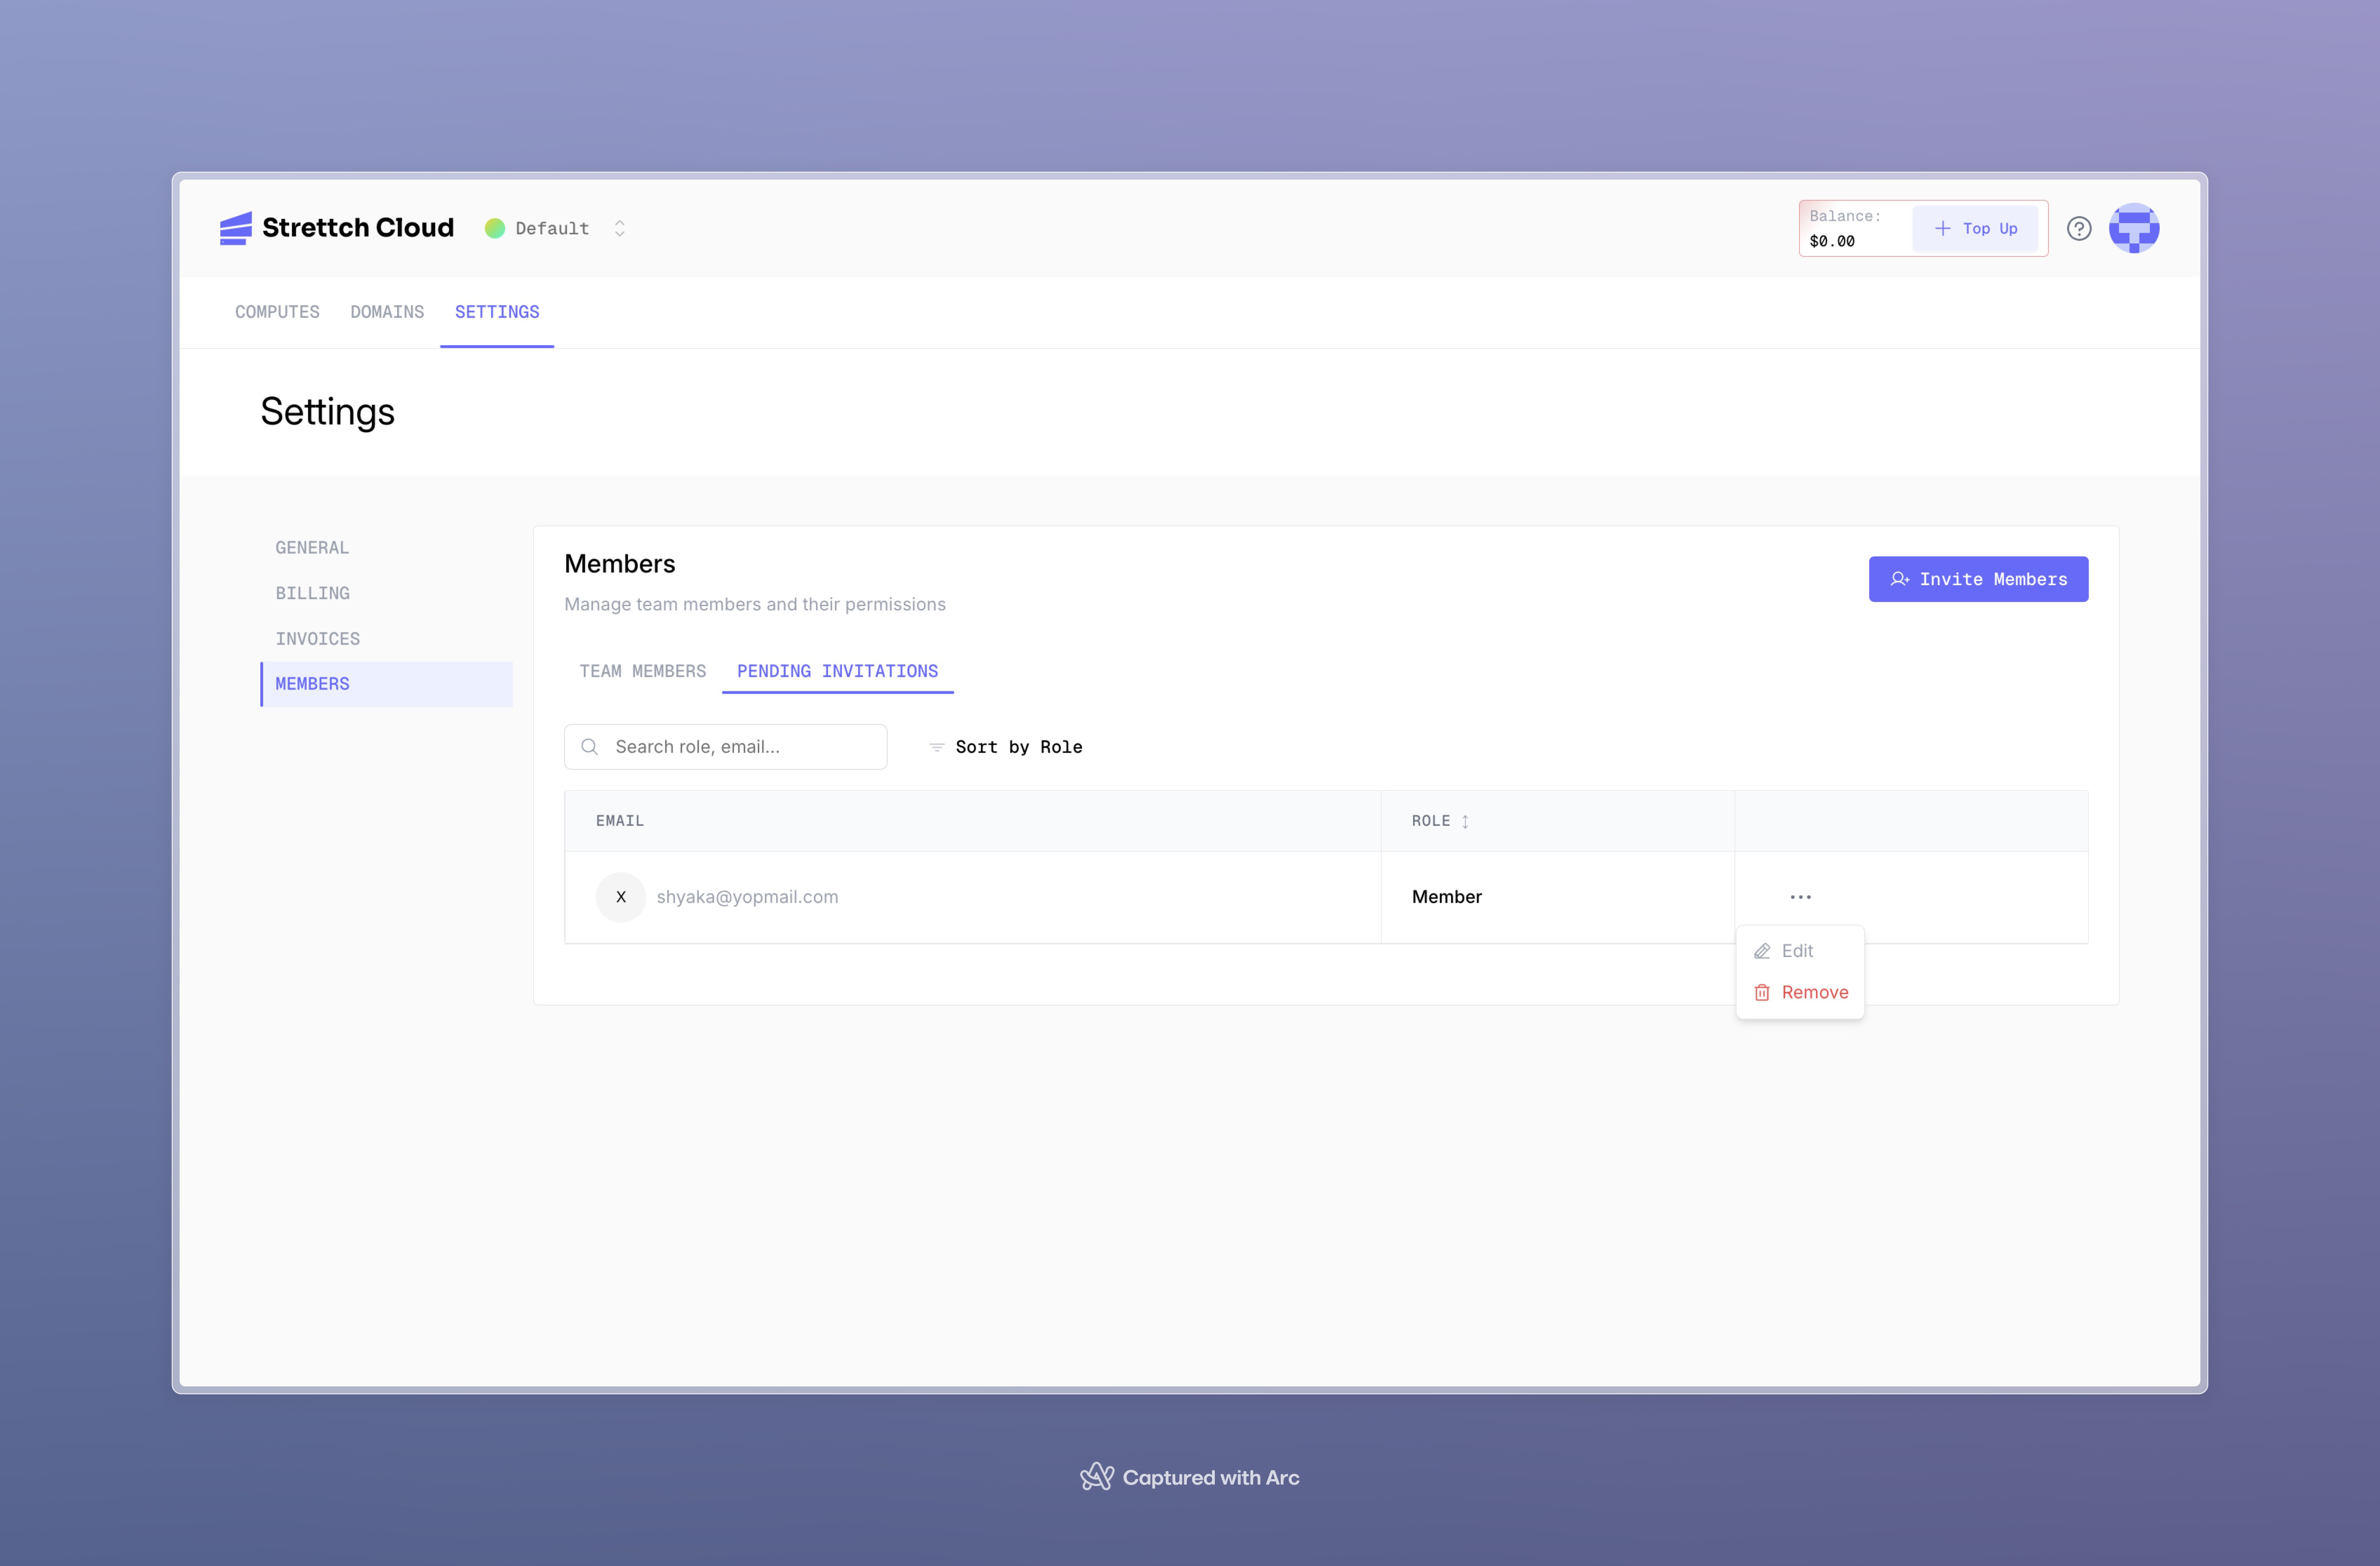
 Open your team settings page from the dashboard. Locate the user whose role you want to change. Click the more options button **...** next to their name and choose **Edit**. Select the new role and confirm. The team member will immediately receive the new permissions. *** ## Leaving a Team You can leave a team if there is at least one other admin who can manage it. Open your team settings page from the dashboard. Under the members section, click **...** next to your name for more options. Click the **Leave Team** button. Confirm that you want to leave. You will immediately lose access to the team and its resources. If you are the only admin or owner, you must promote another member to admin before you can leave the team. *** ## Next Steps Learn more about how teams work in Strettch Cloud Configure payment methods and view team usage **Need help?** Contact our [support team](mailto:cloud@strettch.com) or visit [cloud.strettch.com](https://cloud.strettch.com). # Teams Overview Source: https://docs.cloud.strettch.com/services/teams/overview Understanding team structure and organization in Strettch Cloud ## What are Teams? Teams are the top-level organizational structure in Strettch Cloud. Every resource you create—compute instances, DNS zones, and more—belongs to a team. When you create your first account, Strettch Cloud automatically creates a default team for you, named after your first name (for example, "Liberi's Team" if your name is Liberi). You can create additional teams or join existing ones to collaborate with other users. *** ## How Teams Organize Resources All cloud resources belong directly to teams—there is no intermediate project or organization layer. All team members with appropriate permissions can access and manage these resources. ### Key Principles * **
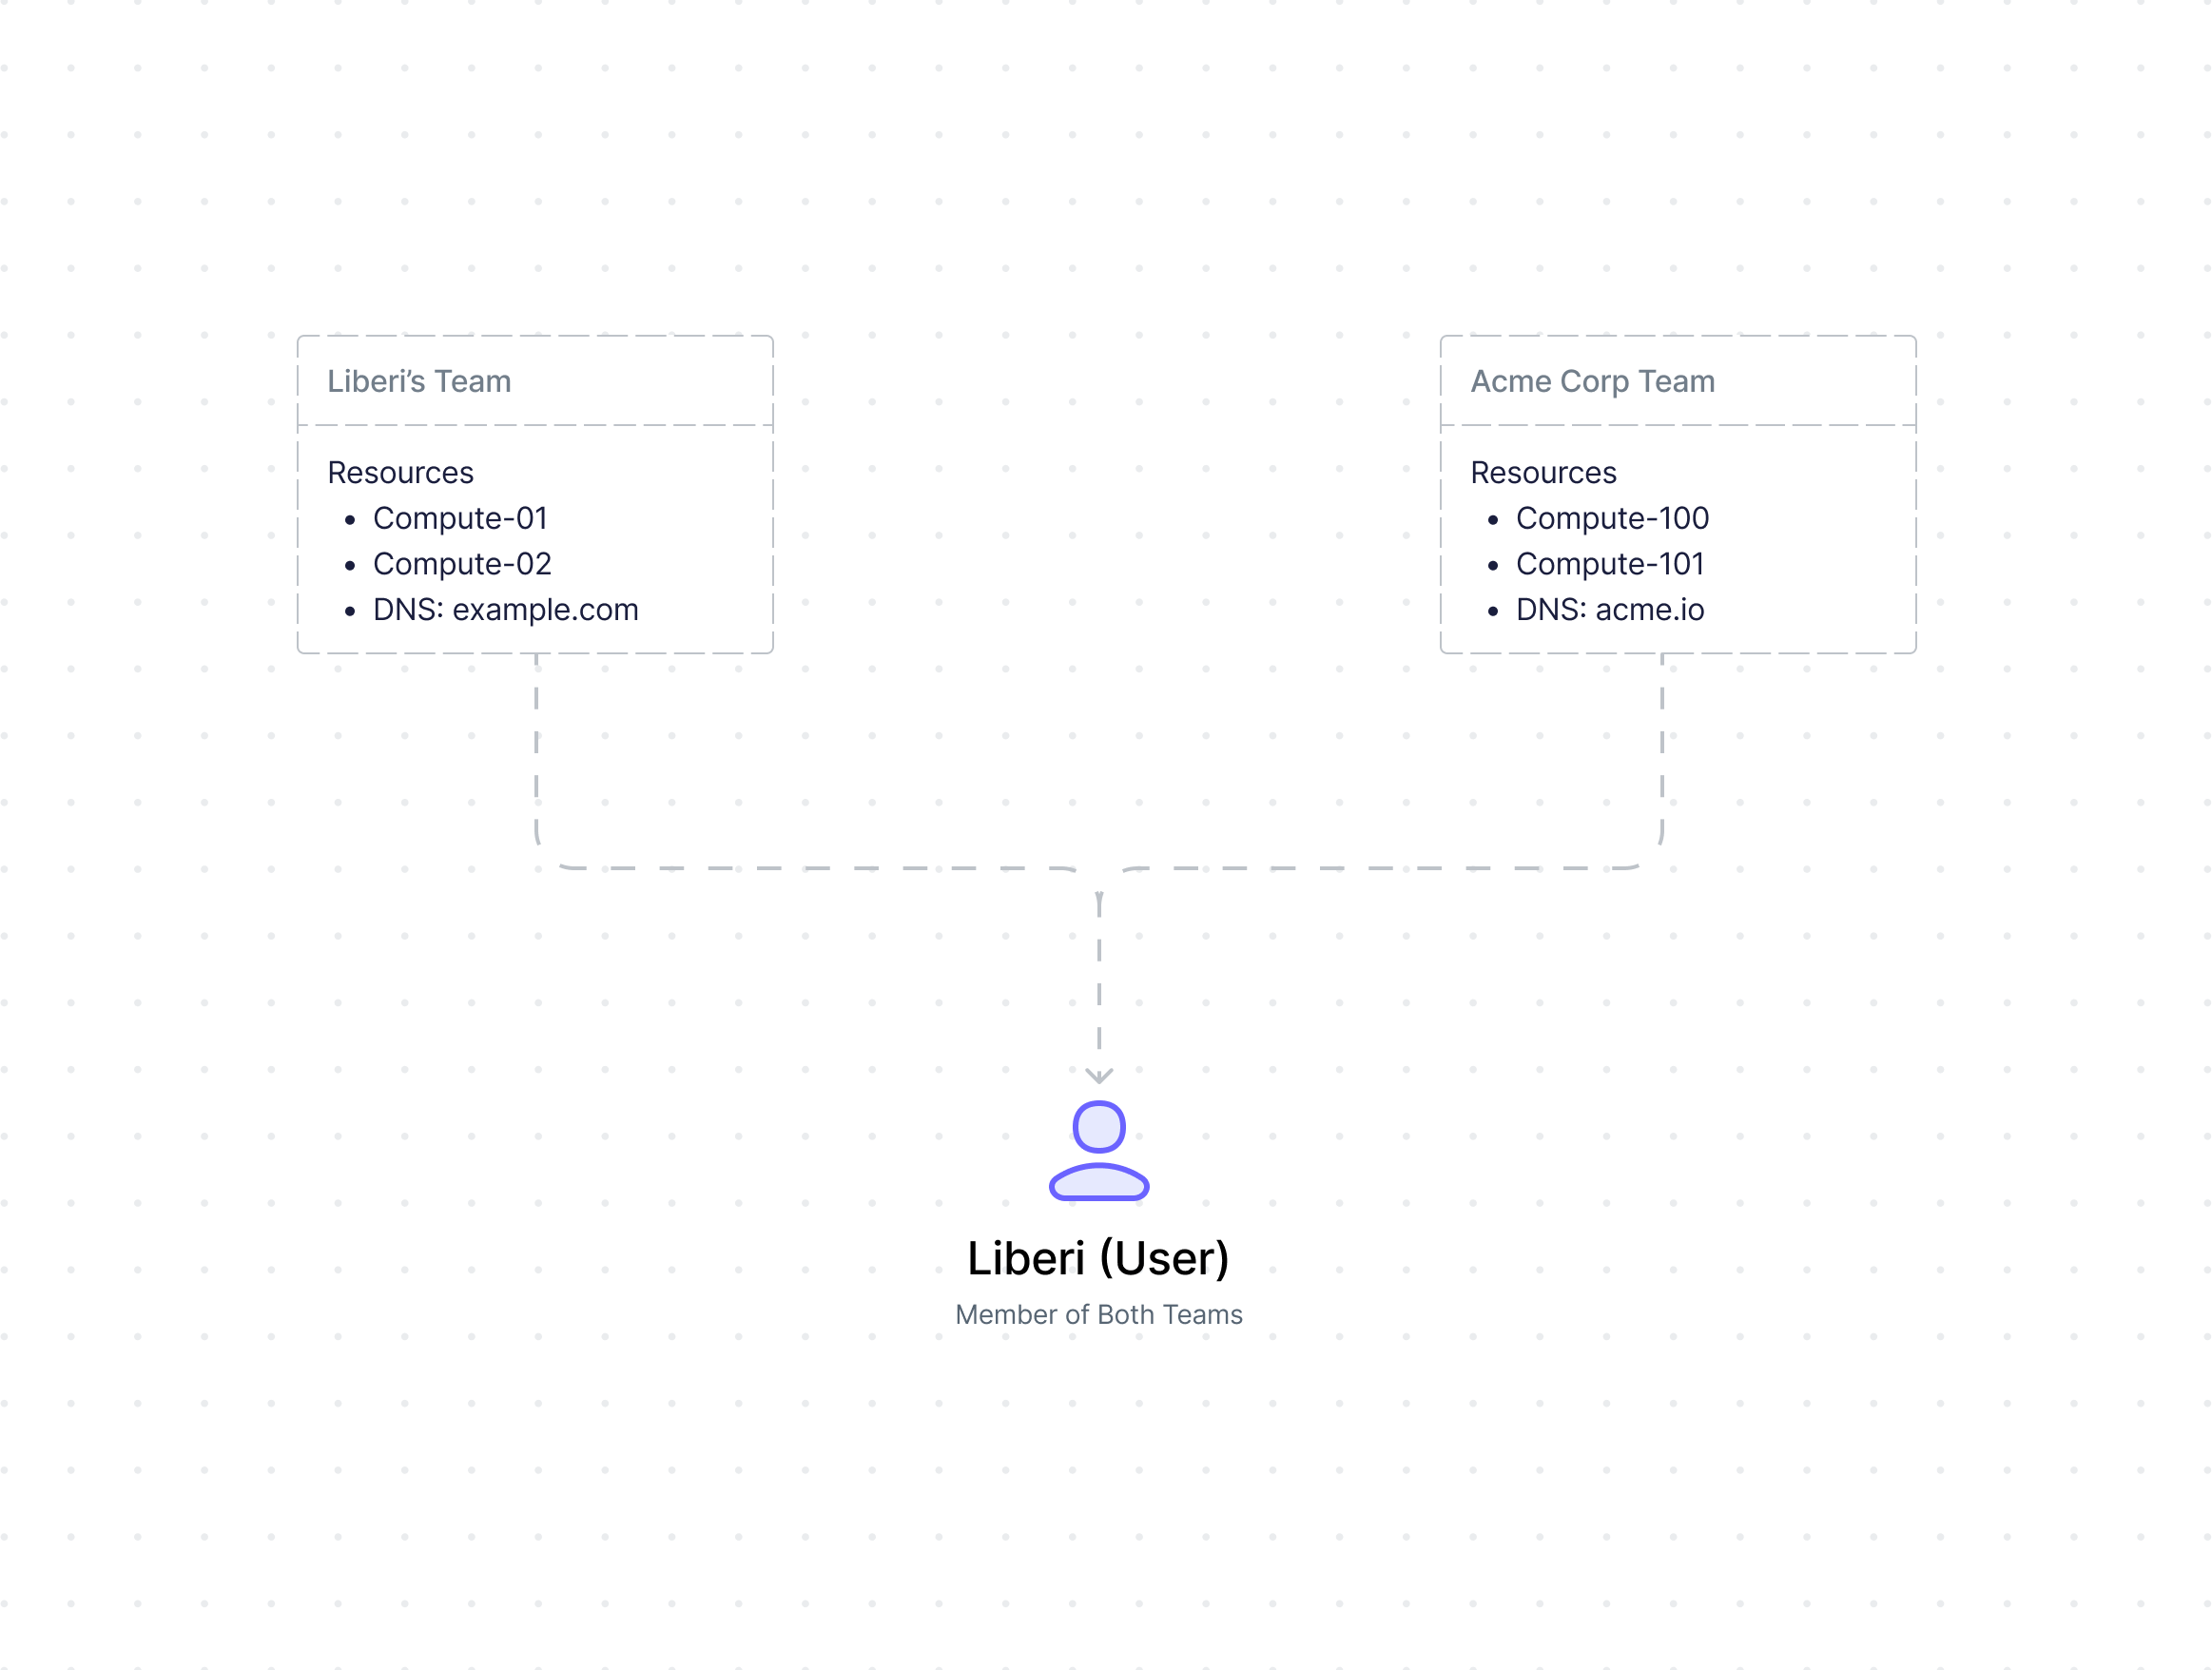
Isolated Resources**: Teams cannot share resources or billing. A compute instance in "Team A" cannot be transferred to "Team B." * **Multi-Team Membership**: You can belong to multiple teams simultaneously, each with independent resources and billing. * **Separate Billing**: Each team has its own billing account. Usage and charges are tracked separately per team. *** ## Team Roles and Permissions Teams use a role-based access control system with three levels: | Permission | Owner | Admin | Member | | ---------------------------- | ----- | ----- | ------ | | **Resource Management** | | | | |     Manage compute instances | ✓ | ✓ | ✓ | |     Manage DNS zones | ✓ | ✓ | ✓ | |     Configure webhooks | ✓ | ✓ | ✓ | |     View resources | ✓ | ✓ | ✓ | | **Team Management** | | | | |     Invite users | ✓ | ✓ | ⛔ | |     Remove Members | ✓ | ✓ | ⛔ | |     Remove Admins | ✓ | ⛔ | ⛔ | |     Change roles | ✓ | ✓ | ⛔ | |     Update team settings | ✓ | ✓ | ⛔ | | **Billing & Finance** | | | | |     View billing info | ✓ | ✓ | ✓ | |     Update payment methods | ✓ | ✓ | ⛔ | | **Critical Actions** | | | | |     Delete team | ✓ | ⛔ | ⛔ | |     Transfer ownership | ✓ | ⛔ | ⛔ | **Violation Policy** If any team member uses a team resource to commit a violation (for example, illegal activity on a compute instance), all resources belonging to that team will be shut down immediately pending investigation. This may result in a permanent ban. ### Switching Between Teams Use the team selector in the dashboard to switch between teams. Resources and billing information change based on the currently selected team. *** ## Next Steps Now that you understand how Teams work in Strettch Cloud: Learn how to invite members, change roles, and manage team settings Start deploying resources for your team **Need help?** Contact our [support team](mailto:cloud@strettch.com) or visit [cloud.strettch.com](https://cloud.strettch.com). # Support Source: https://docs.cloud.strettch.com/support Get help and support for Strettch Cloud infrastructure and services ## Get Support Running your infrastructure on Strettch Cloud? We're here to help you build, deploy, and scale with confidence. Get technical assistance for compute instances, DNS configuration, team management, and more. Technical support for compute, DNS, and infrastructure issues Quick support via WhatsApp: +250 790 877 708 Report platform bugs, request features, or improve docs Connect with other Strettch Cloud users and our team *** ## Support Channels **Email**: [cloud@strettch.com](mailto:cloud@strettch.com) **Response Time**: * Critical infrastructure issues: Within 2-4 hours * Standard technical inquiries: Within 24-48 hours * Billing questions: Within 24 hours * General questions: Within 48 hours **Best for**: * Compute instance issues (connectivity, performance, crashes) * DNS configuration and propagation problems * Networking and IP address issues * Team management and access control * Billing, invoices, and account management * Security concerns and incidents * SC Agent and Metrics troubleshooting **WhatsApp**: [+250 790 877 708](https://wa.me/250790877708) **Response Time**: * Available during business hours (EAT timezone) * Quick responses for urgent infrastructure issues * Standard inquiries: Within 4-8 hours **Best for**: * Urgent technical issues (instance down, DNS outage) * Quick questions about platform features * Real-time troubleshooting assistance * Follow-up on existing support tickets For non-urgent issues or detailed technical problems, email support is recommended as it allows us to provide more comprehensive assistance with logs and screenshots. **Repository**: [strettch/cloud-docs](https://github.com/strettch/cloud-docs/issues) **Use for**: * Platform bugs and errors * Feature requests (new services, improvements) * Documentation improvements and corrections * Open source contributions * API issues and feedback **Guidelines**: * Search existing issues before creating new ones * Provide detailed reproduction steps for bugs * Include instance IDs, region, and configuration details * Use issue templates when available * Tag issues appropriately (bug, feature, docs) **Connect with us**: * [LinkedIn](https://www.linkedin.com/company/strettch-cloud/) - Product updates, case studies, and company news * [X (Twitter)](https://x.com/strettchcloud) - Platform status, quick updates, and announcements * [Instagram](https://www.instagram.com/strettchcloud/) - Behind the scenes, team, and community highlights **Best for**: * Staying updated on new features and releases * Platform status and maintenance updates * Community discussions and networking * General questions and feedback For technical support and infrastructure issues, please use email, WhatsApp, or GitHub. Social media channels are monitored but not suitable for time-sensitive support requests. *** ## Before You Contact Support To help us resolve your infrastructure issues quickly, please gather the following information: ### For Compute Issues: * **Instance ID** or instance name * **Region** where the instance is deployed * **Error messages** or logs from the console * **Recent changes** made to the instance (OS updates, configuration changes) * **Screenshots** of the issue or error * **Time** when the issue started ### For DNS Issues: * **Domain name** experiencing the issue * **DNS record type** (A, CNAME, MX, TXT, etc.) * **Nameserver configuration** at your registrar * **Time** since you made the DNS changes * **Expected vs actual behavior** ### For Billing or Account Issues: * **Account email** address * **Team name** (if applicable) * **Invoice number** or transaction ID * **Description** of the billing question ### General Tips: 1. **Check documentation first** - Visit [Services](/services) for guides and [FAQs](/faqs) for common questions 2. **Verify platform status** - Check our social channels for any ongoing incidents 3. **Try basic troubleshooting** - Restart instance, check network connectivity, verify credentials 4. **Be specific** - Clear descriptions with technical details help us resolve issues faster *** ## Support Guidelines ### What We Support ✅ **Infrastructure Support**: * Compute instance troubleshooting (connectivity, performance, startup issues) * DNS configuration and propagation assistance * Network configuration (IPs, firewall rules) * SC Agent and SC Metrics installation and troubleshooting * Platform feature guidance and best practices * Billing inquiries and invoice questions * Account and team management issues * Security incident response and guidance ✅ **We Will**: * Respond to critical infrastructure issues within 2-4 hours * Investigate platform bugs and performance issues * Provide technical guidance on using Strettch Cloud services * Help optimize your infrastructure setup * Consider feature requests and platform improvements * Keep you updated on maintenance and platform changes ❌ **Out of Scope**: * Application-level debugging (your code, frameworks, or dependencies) * Third-party software configuration (databases, web servers, applications) * Custom development or scripting services * Server administration tasks (OS configuration, software installation) * Security hardening beyond Strettch Cloud platform level * Data recovery from deleted instances or lost data ### Your Responsibilities To receive efficient cloud infrastructure support: * **Provide technical details** - Include instance IDs, region, IP addresses, error logs * **Share configuration** - DNS records, network settings, recent changes made * **Respond promptly** - Answer follow-up questions and provide requested information * **Maintain backups** - We cannot recover data from deleted resources * **Use documentation** - Check [Services](/services) guides before contacting support * **Be respectful** - Professional communication helps us help you better **Policy Updates**: We reserve the right to modify our support policies and terms at any time. Material changes will be communicated via email or platform announcements.